
In contrast to last week’s post, there are times when you may want to reject all changes by just one reviewer. Perhaps they misunderstood the brief, or used the wrong style guide. Or perhaps they’re the dreaded “Reviewer 2.” No matter what reason you’ve got, ditching their suggestions is easy. It takes only a few clicks. Hooray!
Continue reading Reject All Changes by Reviewer 2All posts by Adrienne Montgomerie
Accept All Changes by Just One Reviewer
When collaborating on a Word file, sometimes we want to (or must) accept all of one person’s suggested changes. Maybe they’re the big boss. Maybe they set all the styles in the document. Maybe, they’re the safety reviewer and their changes are essential to make sure no readers blow up; at least not because of this file.
Rather than clicking through each change, figuring out who made it, then clicking either Accept or Next, use this efficient method:
Continue reading Accept All Changes by Just One ReviewerClear All Changes and Comments from a Document
In the editing process, a “clean” file means it’s a manuscript ready for layout. All changes have been accepted, all comments removed, and the editing work is done. Or, maybe the file is nearly ready for layout and the team wants a version that could be ready if it suddenly must be submitted.
Good news! It just takes a couple of clicks to clean the document of all tracked changes and comments.
Continue reading Clear All Changes and Comments from a Document
Make Comments Appear On the Left in Word
Comments posted in a Word document appear on the right, by default, in a region called the Markup Area. But you can have it your way: move those comment balloons to the left, if you want!
Continue reading Make Comments Appear On the Left in WordTake Advantage of Word’s Editing Tools for PowerPoint Files
Editing files in PowerPoint means you don’t have access to Word’s macros and other tools that make editing faster and more consistent. Sure, you could copy the content from each text block on every slide into a Word file, but the net savings just aren’t found in that method.
Enter the export: in PowerPoint, export the file as an RTF, then open that RTF in Word, save it as a docx file, then run your usual magic. Edits need to be transcribed into the PowerPoint file, but it’s still more efficient and effective than plodding away, old school.
Don’t Forget the Speaking Notes
To export the speaking notes, take a few more steps:
- Select Print in the PowerPoint file.
- In the Layout options, select Notes (shown below).
- Select PDF as the output, then Save/Print.
- Open the PDF and select all, copy, then paste the text into a Word file.

Each printer’s interface looks slightly different. To see extended options as shown here on a Mac, click the Show More button that’s probably near the bottom left of the print dialog box. 
Click the third drop-down to access the option to print notes on a Windows computer.
Showing Changes to Files
There’s no Track Changes function in PowerPoint. But using the Compare tool in PowerPoint itself will mark up differences between the original and edited file for everyone to see — and vet — them. Vetting the mark-up is not exactly the same as approving changes in Word. Each change would have to be undone by hand rather than by clicking “reject”. The team might find it easier to work on a final version with the marked-up changes used for reference only.
An Imperfect Solution
Getting the content of a slide presentation into Word for editing isn’t a perfect solution:
- exporting speaking notes takes an extra step (or more);
- changes are not marked up as they are when using Track Changes in Word; and
- changes must be transcribed into the slides.
But it’s better than working without Word’s efficiency altogether.
Got a gnarly Word problem? Submit your problem and we’ll try to answer it in the Q&A thread.


Learn with us! Join a course today.

© This blog and all materials in it are copyright Adrienne Montgomerie on the date of publication. All rights reserved. No portion may be stored or distributed without express written permission. Asking is easy!
Stop the Annoying Formatting Pop-Up When Pasting in Word
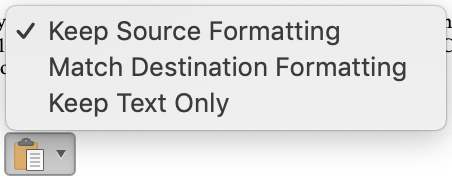
That tiny clipboard icon that pops up whenever you paste something into a Word file can get pretty annoying. It obscures the text and gets clicked inadvertently. It’s usually just technology getting in the way.
Here is how to turn it off in Word 365/2019. Windows instructions follow the Mac instructions. The process hasn’t changed much since 2003.
Continue reading Stop the Annoying Formatting Pop-Up When Pasting in WordA Guide to Word’s Squiggles
Into every Word file, a few squiggles must fall.

In the 2019 release that is a snapshot of Word 365, the grammar and spelling tools are grouped together in a feature Microsoft has called the Editor. On screen, Word flags errors by underlining them. The underlining it uses mean the following:
- red squiggle = misspelled
- blue dots = formatting error
- blue double straight = word choice or grammar error
The flagging of homonyms has improved, as you can see in the left-hand figure, but Word still misses a lot of grammar errors and some of the formatting errors — even when it has flagged those exact errors elsewhere. The errors shown in the screen grabs below are particularly bad, but Word even misses errors they used as illustrations in Word’s own help files.

Word flagged the yellow spelling and grammar errors but missed all the blue ones. 
With all grammar options turned off, Word still flags the homonym.
Turning On Grammar & Spelling Display
- On a Mac, go to Word > Preferences > Spelling & Grammar.
- Windows users, click Options on the File menu, then select Proofing. In the area headed “When correcting spelling and grammar in Word,” click the Settings… button.

Turning Off Grammar & Spelling Display
You can turn off grammar checking, and you can deselect a lot of the checks, but even if you turn off the display of spelling errors, homonyms will still be flagged. (Right figure, top.)
While many editors turn off the grammar checker because Word’s advice is misguided more often than not, the blue “wrong word” checker cannot be turned off.
To get rid of the flags, select “Check Document” or “Recheck Document” in the spelling & grammar settings after deselecting “Mark grammar errors as you type” and “Check grammar with spelling.”


mapf
Marketing Action Plan for Freelancers
Get the preview and buy the book on Lulu.
Open the resources with the password in your book.


Anonymize Metadata in a Word File
Sometimes editors don’t want their work time-stamped, as MS Word does automatically when tracking changes or comments. Or the editor wants the “user name” removed from the tracked changes because they used someone else’s computer, for example. They don’t want the client thinking they outsourced the work without permission.
There are two ways to change the user name tags on comments and tracked changes. One method is to use the Compare Documents function, which lets you specify a user name for all the changes found between two documents, giving them all identical time stamps. We’ll talk about that more in another post.
Continue reading Anonymize Metadata in a Word FileSet User Info to Brand Your Comments in Word
When you’re working on a file, making edits and leaving comments, Word tags every change with your “name.” But is it really your name? Some computers will tag changes and comments with “Computer User”, and some will say gibberish like “adrn9bz”. Set up the system you’re using with your name, role, or business name to help everyone on the team decipher each person’s contribution and to build name recognition for your work.
Where to Find the Settings
You’ll find the “user name” setting in the preferences for Word 365 (Office 2016 or 2019 too).
- On a Mac, it’s called User Information and is found in Preferences from the Word menu at the far left.
- Windows users will find this setting in the Personalize your copy… section of the General “tab” in Options from the File ribbon. (File > Options > General > Personalize your copy…)
This name will appear on tracked changes and comments in all Office programs, and in the metadata relating to the creator or editor of the file.

Mac, Word 365 
Windows, Word 365
Branding Tip
Use your business name or moniker if your name is long, like mine, or to remind the team of your business name every time they see one of your comments. Repetition is key to branding and to marketing.
Some clients will want to see your role as the user name, so the team knows which changes were suggested by Copyeditor and which were by The Big Boss. You can change the user name when working on their files. Just remember that the user name applies to all documents you work on from that point forward, not just their file.

It’s Not Working
There are three reasons that setting the user name goes wrong:
- It only works from this point forward. So it won’t change the “Author” tag on any existing changes. This is handy if you want to preserve others’ changes, but annoying if you only remember to change the name in the middle of your work.
- The computer’s log in name will be used unless you check the little tick box below the field you entered your name in. You can see the “Always use this name/these values regardless of [how I’m] sign[ed] in to Office” box in the screen grabs above in this post. The wording is slightly different on each operating system just to irk editors.
- The file is set to “remove personal info from this file on save.” That’s handy for dropping time stamps, but will completely scupper attempts to keep several reviewers’ input separate or to brand your work with your name. More on that in another post.