Adrienne is an editing instructor and certified copyeditor with 27+ years experience editing technical materials that inform and educate. They created the Right Angels and Polo Bears podcast in 2013, have been teaching editing in university publishing programs since 2012, and has published books on science, editing, and freelancing.
Sometimes a table seems stuck in its alignment. No matter how many times you select the whole table and set paragraph alignment, it won’t budge. The trick is to drag the table using its grab point:
Hover over the table until the grab point pops up. That’s the 4-way arrow at the top left corner of the table.
Click on the grab point and drag the table where you want it.
Hover the cursor over a table to make the grab point appear.
To make sure the table aligns with the margins, reveal the ruler by checking the box on the View ribbon.
The pilcrow has marked the end of a paragraph since long before there were computers. The little backwards ¶ today is found hiding in documents, storing vital format information, and marking paragraph breaks.
Click the little pilcrow (¶) on Word’s Home ribbon to see all the behind-the-scenes formatting marks that make documents look good. But what are those marks? See the table for a list.
Section breaks are created around columns and tables of contents automatically, and they can be inserted to control any layout aspect of a certain segment of text. Section breaks can be deleted, but what if you just want to change the section. On a Mac, you can.
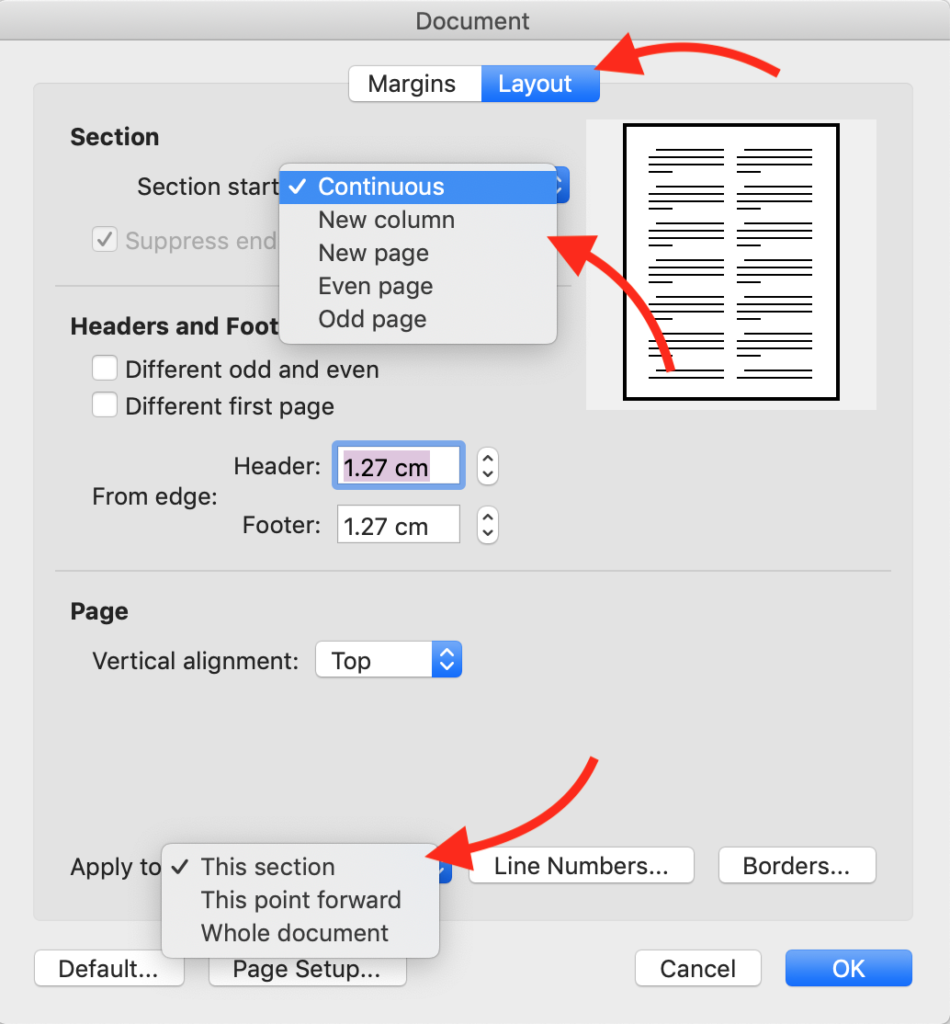
To
change the type of a section after inserting a break:
Place the cursor in the desired section.
On the Format menu, select Document.
Select the Layout tab in the Document properties dialogue box that opens.
At the top, in the Section area, choose an option from the drop-down list beside Section start:
At the bottom, choose an option from the drop-down list beside Apply to. The type of section can be applied to the section the cursor is currently in, to all sections following the cursor’s location, or to the whole document.
Click OK.
Troubleshooting
Break marks are only visible when non-printing characters are revealed. Click the pilcrow (reverse P: ¶) icon on the Home ribbon to show non-printing characters.
Sometimes in Print Layout view, section breaks get obscured at the bottom of the page. Switch to Draft view to reveal them.
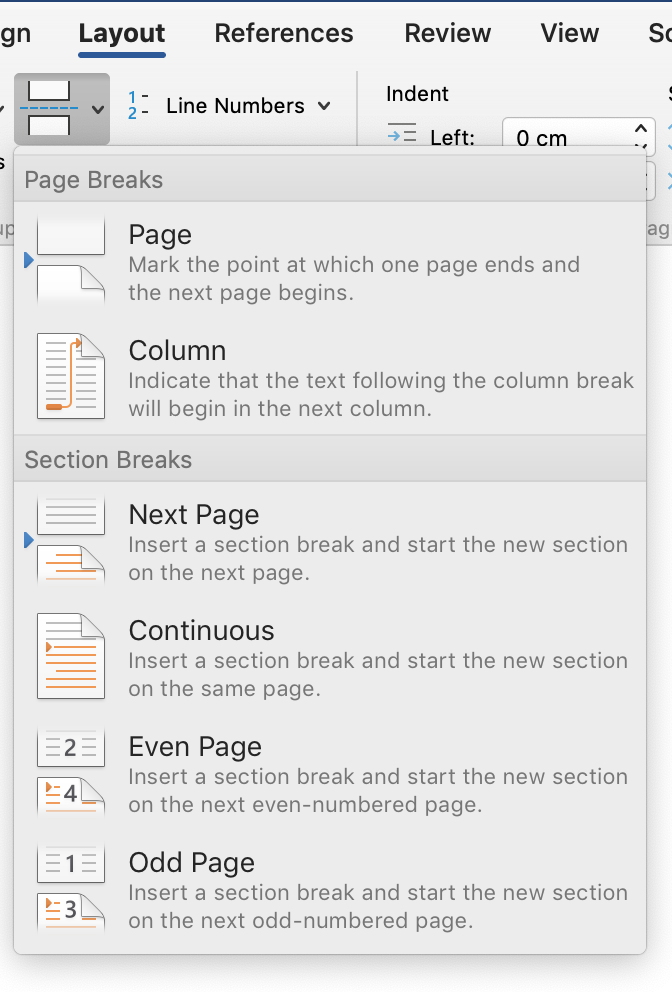
Word lets you insert a section break, not just a page break. That lets you assign different settings for each section: margins, columns, line numbers, heading numbers, or footer layout, for example.
There are two main types of section break:
On the Layout Ribbon, you’ll find this drop-down list of Breaks in the Page Setup area on the left.
one break starts a new page (next, next odd, or next even numbered page)
the other starts a new section on the existing page (continuous).
Uses for Section Breaks
Section breaks can be used to change page numbering — from Roman to Arabic, for example — or to make sure there’s no page number on the first page of a chapter.
Section breaks can be used to restart automatic numbering for each new chapter, so that numbering starts at 1 for figures, tables, footnotes, and/or headings.
Section breaks are inserted automatically around blocks of text formatted with a margin or page orientation that is different from the rest of the document, and around a table of contents.
Uses for Odd Page Section Breaks
Since layout conventions have chapters start at the top of an odd numbered page (the right-hand page), inserting an Odd Page section break might be the most useful option, though it is seldom used.
By inserting the Odd Page section break, you can guarantee that the content following the break will start at the top of a right-hand page (in Word or in the printed/PDF output), no matter what content before it gets moved, added, or trashed. No need to insert blank pages. And typesetters and designers can use these breaks to automatically set layout via macros that read the code.
Uses for Continuous Section Breaks
The Continuous section break does not force the start of a new page. We see this type of break most often right before a column layout begins, and where columns end. It also appears before and after a table of contents.
Here the continuous section break is visible before the columns start, marked with a double zig-zag line.
Troubleshooting
To delete a section break, click on it and press the delete key. The settings for each section are contained in the break at the end of it. So, when a section break is deleted, everything in the previous section will take on the characteristics of the section following it.
Break marks are only visible when non-printing characters are revealed. Click the pilcrow icon (¶) on the Home ribbon to show non-printing characters.
Sometimes in Print Layout view, section breaks get obscured at the bottom of the page or at the end of a column. Switch to Draft view to reveal these breaks.
Don’t ¶¶¶¶¶¶¶. Use a page break to avoid layout nightmares.
Each chapter starts on a new page. Sometimes a section needs to start at the top of a page too. Even though Word is not a layout program, it helps the editorial process and the layout process to format the Word manuscript with proper page breaks.
The worst way to force a page break is to hit Return a bunch of times. Those hard returns mess up where the page breaks whenever content is moved around or margins are changed. And those hard returns misalign the page breaks whenever Word adjusts layout for another user’s printer; or when font changes either for headings or the body text. Those hard returns have to be manually removed by designers and typesetters when doing their work, and each of those changes is an opportunity to introduce errors and add cost.
Basically, the hard returns are a layout nightmare.
See the multiple blue pilcrows on the left page forcing a page break? They’re a nightmare.
Insert the Page Break from the Pages area of the Insert ribbon.
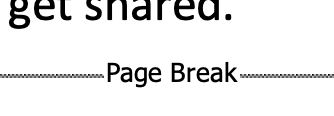
Instead, insert a page break. Place the cursor where you want the new page to start. On the Insert ribbon, select Page Break.
In Page View, all you’ll see is that a new page begins. To see where the page breaks are, either go to Draft view or turn on non-printing characters. Then Word will reveal a grey line at the bottom of a page, containing the words Page Break. That is shown in close up below, and in two-page view above, right.
If there are still multiple hard returns in the document after inserting page breaks where needed, delete them. Use Find & Replace for ^p^p to ^p, to make this step easy.
Word used to number comments automatically; you could see those numbers in the comment balloons at the right. Those numbers were handy because they aided cross-referencing and let us refer to specific comments in transmittal memos and other discussions.
Word still numbers comments, but those numbers don’t appear in the balloons in the markup area. Here are three ways to see them: in the Review pane, in Draft view, and by printing a list of markup.
Sometimes it’s nice to have comments numbered in a document. That lets you refer to comments by number, which is useful for cross referencing (e.g., “See comment 12 again.”) or for talking about the comments in a transmittal memo, for example. Word used to number comments automatically. It still does, but those numbers are usually hidden. You can see the numbers on comments if you print off the markup, or by looking in the Review Pane. Numbers on comments also reveal themselves when looking at a document in Draft mode.
Modify the style for Comment text, setting the text to automatic numbering:
Select Numbering from the drop-down Format menu at the bottom left of the Modify Styles dialogue box.
Troubleshooting
Windows users may find that comment text is styled as Normal instead of as Comment Text. Changing the Normal style will change all text in the document that is set to Normal, and you probably don’t want to do that.
There are two primary snafus to be aware of when using this numbering method:
The numbering applies to all comments, not just your own. You’ll see that other reviewers’ comments are numbered sequentially along with your own.
As with any numbered list, the numbering will update every time you add or delete a comment, and when you reply to a comment. Remember this if you are cross-referencing comments. Numbers can change; be sure to double check them.
If your comments contain paragraphs, each paragraph will get numbered. To avoid this, use a “soft return” instead of a paragraph break. On a Mac, do this by holding down shift when you hit return.
There are at least two reasons you might want to have a “print” copy of the tracked changes and comments in a Word document: to distribute hard copy, or to extract the information into a memo or other use. Print is in scare quotes because this method can produce a PDF just as easily as a paper copy.
By changing the style settings of Comment text, you can make the text size bigger, make the lines double spaced, change the font, its colour, or any other attribute.