Category Archives: Word-Wrangling Wednesdays

Q&A: Stop Tables Resizing

DoubleTable - expanding table 2010 on Behance

Q: I keep resetting the width of a column in my table, but when my client opens it, the column snaps back to 6″ wide! The same thing happens to me if I open the file on another computer.

A: Ugh, this is a great example of why Word is not the best choice for document design. But, there are three settings you can change to try to stop the table from resizing at least until the file goes to layout. These options are not fail-safe, but they’re your best bet:

  • Table properties
  • Table options
  • Autofit settings

Table Properties

The usual culprit behind endless resizing is found on the Column tab in the Table Properties dialog. Open that by clicking the Properties icon on the (Table) Layout ribbon. Deselect the option that sets a preferred width. Make sure the cursor is placed in the offending column, first.

Word's table layout ribbon
The (Table) Layout ribbon appears when the cursor is placed in a table. If your screen is wider, the icons at left where the Properties icon is found will be laid out in a line, no stacked.

Table Options

Screen Shot 2020-04-01 at 9.32.10 AM.png

Deselect the “Automatically resize to fit contents” option? Find that from the Options button on the Table tab in the Table Properties.

Autofit Settings

Screen Shot 2020-04-01 at 9.34.56 AM.png

Selecting “Fixed Column Width” (see pic) from the menu that opens when you click the AutoFit icon on the (Table) Layout ribbon.


Got a gnarly Word problem? Submit your problem and we’ll try to answer it in the Q&A thread.


Learn with us! Join a course today.

© This blog and all materials in it are copyright Adrienne Montgomerie on the date of publication. All rights reserved. No portion may be stored or distributed without express written permission. Asking is easy!

Working With Tables: Moving Rows & Columns

This is as simple as select, click, drag, release. To rearrange columns and rows, just select the row or column and then drag it where you want. Release the mouse to place the contents. Watch the demo below to see some of the snafus in action, as well as how to avoid them.

Troubleshooting

Click and drag too finicky? Page scrolling out of control? Use cut and paste instead. Cut the entire column or row, then place the cursor where you want to insert the text — be sure it’s at the beginning of the text in the first cell of that row/column — and then paste.

Merged cells (like spanning heads) can wreak havoc. Try inserting a blank row/column and move the selection there, then erase the blank.


a map "locator pin" styled as the MS Word logo

Check out all the other posts in this series about Working with Tables and learn all about them in the multimedia ebook self-study course!


Got a gnarly Word problem? Submit your problem and we’ll try to answer it in the Q&A thread.



Learn with us! Join a course today.

© This blog and all materials in it are copyright Adrienne Montgomerie on the date of publication. All rights reserved. No portion may be stored or distributed without express written permission. Asking is easy!

Working With Tables

A GPS map search for TABLES at Editing in Word 365

If you’ve found this series on editing tables helpful, try our course! The course includes a downloadable resource with all the information in one, updated ebook and extra demos, plus you’ll get exclusive access to a checklist for quality control and a self-check exercise with answer keys for various style guides.

Continue reading Working With Tables

April’s Word Fools

A random funny photo by David Blackwell. CC BY-ND 2.0

Since it will be hard to take anything seriously today, on this Word Wrangling Wednesday that lands on April Fool’s, we bring you what some might think of as silliness with Word. This is both a “trick” and an actual function. Try it out!

Generate Random Text

If you’ve watched my demo videos, you have seen some nonsense text that I use in them. Word can generate this “random” text right inside a document — though it seems to pull text from the help files, so it’s more “dummy text” than it is random. Simply type the phrase below into a document, replacing x with the number of paragraphs you want and y with the number of sentences. Then hit Enter to generate the text.

=rand(x,y)

To generate classic Lorem ipsum text instead, use the same approach as above, instead writing Lorem where rand appears. For example:

=Lorem(2,4)

And to satisfy your typing teacher, you could even generate the classic phrase “the quick brown fox jumped over the lazy dog,” over and over again, by typing this:

=rand.old(x,y)

Troubleshooting

Of course, the problem with placing this dummy text in a document is that some of it may survive through production and live on forever in the final product. User beware.


Got a gnarly Word problem? Submit your problem and we’ll try to answer it in the Q&A thread.


Learn with us! Join a course today.

© This blog and all materials in it are copyright Adrienne Montgomerie on the date of publication. All rights reserved. No portion may be stored or distributed without express written permission. Asking is easy!

Working with Tables: Checking Totals

Formulas are built right into Word, so you can check totals with a click! Errors love to lurk in tables, checking the numbers can make an editor look like a hero. Just click the Formula icon on the right edge of the (Table) Layout ribbon. But watch for the snafus (see Troubleshooting).

Troubleshooting

Address most of these issues by pasting the table into Excel and using its more sophisticated formula functions.

The “ABOVE” parameter stops at empty cells, as shown in the demo. It’s possible to specify a row range instead e.g., 3:11) but it’s unclear how Word numbers the rows.

a map "locator pin" styled as the MS Word logo

Check out all the other posts in this series about Working with Tables and learn all about them in the multimedia ebook self-study course!


Got a gnarly Word problem? Submit your problem and we’ll try to answer it in the Q&A thread.


Learn with us! Join a course today.

© This blog and all materials in it are copyright Adrienne Montgomerie on the date of publication. All rights reserved. No portion may be stored or distributed without express written permission. Asking is easy!


Working With Tables: Repeating Headers

With this post, our series on working with tables in Word moves into more uncommon situations. For this post, we will again talk about documents that are being finalized in Word — without moving the manuscript into a design program — as is often the case with internal reports and proposals.

Tables longer than one page usually need to have their column headings repeated on every page. Word can do this automatically! And Word will keep those headings at the top of each page even as you manipulate the table contents and structure.

How to Make Table Headers Repeat

Watch the video demo below, or follow these steps:

At any point in the creation of the table, select the rows you want to repeat, then click the Repeat Header Rows icon in the Data group at the right end of the (Table) Layout ribbon.

Alternatively, select the header row(s), then click the Properties icon on the (Table) Layout ribbon to open the Table Properties dialog shown below. On the Row tab, check the box that says “Repeat as header row at the top of each page.” Then click OK.

Troubleshooting

When a table is set to have text wrap around it, the header will not repeat on subsequent pages. On the Table tab in Table Properties (shown above), make sure that Text Wrapping is set to None, not Around.

a map "locator pin" styled as the MS Word logo

Check out all the other posts in this series about Working with Tables and learn all about them in the multimedia ebook self-study course!


Got a gnarly Word problem? Submit your problem and we’ll try to answer it in the Q&A thread.


Learn with us! Join a course today.

© This blog and all materials in it are copyright Adrienne Montgomerie on the date of publication. All rights reserved. No portion may be stored or distributed without express written permission. Asking is easy!

Working With Tables: Converting to Plain Text

In the first post in this series, we learned how to convert a manual table to a true table. After examining seven other aspects of tables, it’s time to look at the reverse: converting a table into simple text. There’s no need to click and drag contents out of their individual cells, Word will convert it with just a couple of clicks:

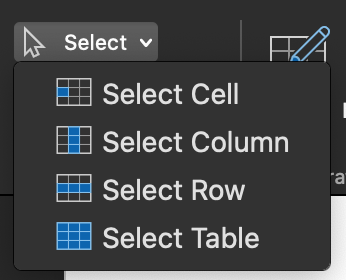
Or, use the Select icon on the (Table) Layout ribbon.
The grab point pops up when the cursor is in a table.
  1. Hover the mouse pointer over the table until the grab point pops up at the top left corner, then click it. Or click anywhere in the table and then click the Select icon on the left edge of the (Table) Layout ribbon and click Select Table.
  2. On the Layout ribbon, look in the Data cluster at the right edge and click the Convert to Text icon. From there you can tell Word whether to separate the text using tab marks, paragraph marks, or some other mark you specify, like perhaps a semicolon.

Troubleshooting

Keep a copy of the original so you can check that the content is still in the right order.

You may have to delete empty lines and do a little more consolidation after the conversion.

a map "locator pin" styled as the MS Word logo

Check out all the other posts in this series about Working with Tables and learn all about them in the multimedia ebook self-study course!


Got a gnarly Word problem? Submit your problem and we’ll try to answer it in the Q&A thread.


Learn with us! Join a course today.

© This blog and all materials in it are copyright Adrienne Montgomerie on the date of publication. All rights reserved. No portion may be stored or distributed without express written permission. Asking is easy!

Working With Tables: Add or Delete Rows and Columns

There are several easy ways to add or delete columns and rows in tables within MS Word:

  • Right-click and select from the context menu.
  • Select from the icons on the (Table) Layout Ribbon.
  • Select the row/column and cut it using ctrl + X (cmd + X on a Mac).
  • Select the Eraser icon on the (Table) Layout Ribbon and drag it over the undesired elements.
  • And, if all you want to do is add a row: place the cursor outside the end of the row, then press Enter.
Word's table layout ribbon
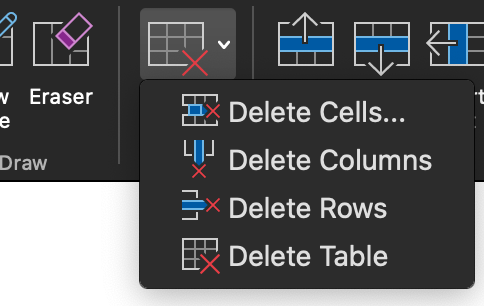
This Layout ribbon appears when the cursor is placed in a table. Use the icons in the Rows & Columns group on the left to add table elements. Click the Delete icon to expand its options.
Click the Delete icon to expand its options.

Check out the demo video below to see these methods in action.


a map "locator pin" styled as the MS Word logo

Check out all the other posts in this series about Working with Tables and learn all about them in the multimedia ebook self-study course!


Got a gnarly Word problem? Submit your problem and we’ll try to answer it in the Q&A thread.


Learn with us! Join a course today.

© This blog and all materials in it are copyright Adrienne Montgomerie on the date of publication. All rights reserved. No portion may be stored or distributed without express written permission. Asking is easy!
Working with Tables: Aligning a Table on the Page

While most publishing production flows want the simplest of tables in a manuscript, sometimes Word is the design software. We see this often when creating documents for in-house use only — such as reports and proposals; these are often produced entirely in Word. So here is how to make sure the table behaves the way you want it to on the page, overall.

The primary methods are shown in the video demo at the bottom of this post are:

  • Dragging
  • Setting properties
  • Setting paragraph alignment

Drag the Table

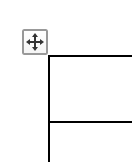
Hover the cursor over the table to reveal the grab point on the top left corner (shown at right). Click that to drag the table anywhere on the page.

This method is particularly useful for moving a table closer to its reference in the text or placing it outside the margin of the body text.

Setting Properties

With the cursor placed anywhere in the table, select the Properties icon on the left edge of the (Table) Layout ribbon.

Word's table layout ribbon
This new Layout ribbon appears when the cursor is placed in a table.

Then set alignment for the table itself (cell contents are set separately) and whether the surrounding text will wrap around the table border or split above and below the table. Click OK.

This Table Properties dialog box can be opened by right-clicking on a table, as well as by selecting the Properties icon from the (Table) Layout ribbon.

Setting Paragraph Alignment

Rather than selecting the Alignment for the table in the Table Properties, you can simply click the left, center, or right align icon on the Home ribbon, if the whole table is first selected. These icons set alignment for cell contents if only the cells are selected, not the whole table.

In the Paragraph group on the Home ribbon, you can set which page margin a table aligns to, if you first select the whole table.
a map "locator pin" styled as the MS Word logo

Check out all the other posts in this series about Working with Tables and learn all about them in the multimedia ebook self-study course!


Got a gnarly Word problem? Submit your problem and we’ll try to answer it in the Q&A thread.


Learn with us! Join a course today.

© This blog and all materials in it are copyright Adrienne Montgomerie on the date of publication. All rights reserved. No portion may be stored or distributed without express written permission. Asking is easy!
Working with Tables: Aligning Numbers

Left and right alignment aren’t going to cut it when aligning numbers in tables. Best practice to align numbers on the decimal. Aesthetics dictate that the numbers also be centred. Tab settings make this process elegant, and the ruler makes it intuitive. See it in action in the demo video at the end, and read the steps below.

  1. Select the cells whose contents you want to align by clicking and dragging across them.
  2. On the ruler (revealed via the View ribbon), click the left corner edge several times to change the tab mark selection to “decimal align” (the up arrow on a point, shown at right).
  3. Click on the ruler to place the tab.
  4. Click on the tab mark and drag it along the ruler to adjust its placement.

Word is not a layout tool, but sometimes, it is what you have to use. Compositors also appreciate having table formatting close to ideal, so editors end up tweaking alignment frequently.

a map "locator pin" styled as the MS Word logo

Check out all the other posts in this series about Working with Tables and learn all about them in the multimedia ebook self-study course!


Got a gnarly Word problem? Submit your problem and we’ll try to answer it in the Q&A thread.


Learn with us! Join a course today.

© This blog and all materials in it are copyright Adrienne Montgomerie on the date of publication. All rights reserved. No portion may be stored or distributed without express written permission. Asking is easy!