Click less when resolving tracked changes with this pro tip!
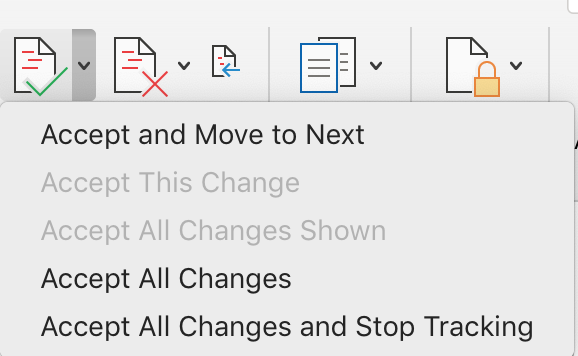
Find this menu of commands by clicking the tiny down arrow beside the Accept icon on the Reviewing ribbon.
Reject changes you do not like, and leave the rest. That leaves a document full of changes that you do want to accept. Then, select Accept All Changes from the Review ribbon and clean up the file with a single click!
Open this menu in the Track Changes area of the Review ribbon.
Always give a document a once-over in Simple Markup or No Markup view before submitting it as a finished edit. This often reveals a bunch of formatting errors that arise from working with markup displayed (that is, with Track Changes visible). Common errors often obscured by the redlining on the screen include:
The footnote function is one of the great features of Word: it will automatically change numbering, place them in order at the bottom of the page, shift them as pages grow and shrink, and renumber when they are moved around. The endnote function is similarly great. And even better, you can use both in one document!
However, editing footnotes and endnotes poses some challenges. Sure, Word will track changes you make to the words in the note, but it doesn’t handle other edits quite so smoothly, as shown in the demo video below.
QWhen running a full Spellcheck, Word won’t suggest the right word. What can I do besides writing down the misspelling and searching it out later to correct it manually?
AYou’re in luck! Just click in the document itself and make the change (Fig. 1), then return to the Spellcheck (now called Editor) window and resume. See details and demo video below.
Several comments were split into tiny bits and populated all following comments.
Word malfunctions in myriad ways, but sometimes it gets borked in SPECTACULAR ways. I have seen it completely obliterate any copy of the file, as though it borrowed the infinity gauntlet. It has spread a comment into tiny bits over the subsequent comments (see image). It has caught the vapours and decided it simply cannot show tracked changes anymore or run spellcheck…
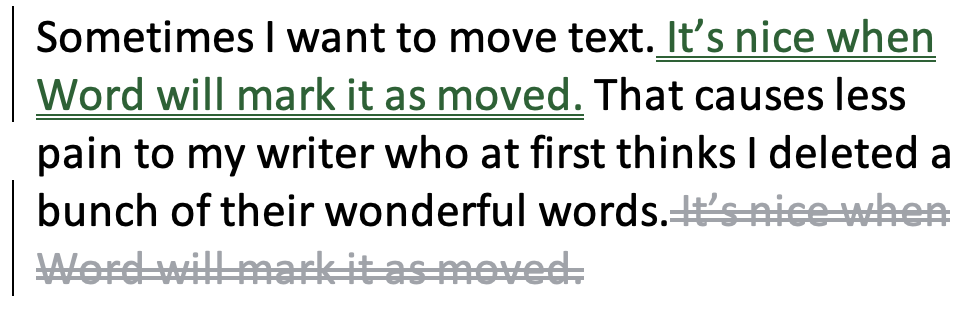
My Word options are set to mark moved text as shown above.
The problem is that this function is glitchy in Word. Sometimes you just can’t get the text to be marked as “moved.” After checking that the Preferences for Track Changes (see figure below) are indeed set to mark moves, try these two solutions:
The difference between – and — is one of those dog-whistle edits that people in the know find make a document elegant versus incorrect, and literally nobody else even notices in the slightest. One of the challenges in using dashes correctly is simply seeing which one is in use: en or em length. In some font families, the dashes are nearly identical length! While editing, you can make this blazingly obvious by colour coding the various dashes so they stand out while you work. At the end, simply remove all highlighting.
How to Colour Code Dashes in a Manuscript
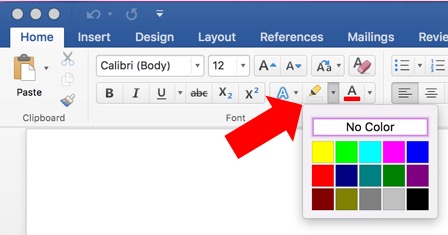
Fig. 1 Highlighting colour choices on the Home ribbon.
Turn off Track Changes. You’re going to undo this highlighting later, so there’s no need to bog down the file by tracking this.
Select the teal* highlight tool on the Home ribbon (Fig. 1), or by selecting it from the pop-up when you right-click on a Windows computer.
Using Advanced Find and Replace, search for a hyphen (just type a hyphen in the Find field).
In the Replace field, type a hyphen again, then from the Format menu in the More options, click Highlight (Fig. 2 below). Word applies the highlight colour that was selected in Step 2.
Click Replace All.
Close F&R and start over at Step 2, this time selecting green, then search and replace for an en dash in Steps 3 and 4 (Fig. 3).
Repeat with violet for the em dash.
Fig. 3 Click the down arrow to open the menu of special codes (regular expressions) and select En or Em Dash if you don’t know the keyboard shortcut.
Fig. 2 Click More to see this menu on the Advanced Find & Replace dialog. Select Highlight… here in Step 4.
Proceed with your edit as usual. Then, at the end, select all and set Highlighting to No Color. (See Troubleshooting below.)
*The colour of highlighting you choose for each doesn’t really matter; that can be your choice. What matters is that they are different colours from each other and that they are different from any other highlighting you use to colour-code your manuscript. That way you can remove highlighting from these characters later without removing highlighting you want to keep.
Fig. 4 Hyphen, en and em dashes in the manuscript will end up looking like this.
Side-by-side, it’s easy to tell the various dashes apart, but the highlighting will help you identify them without effort when they appear alone.
Of course, you could put this in a macro that runs at the beginning of your edit along with removing double spaces, setting the language, the zoom, etc. For instructions on how to do that, look inside the book.
Pro-pro Tip: Add this sequence to your start-up macro and it will happen automatically every time.
Troubleshooting
If there is highlighting in your document that you need to preserve — such as highlighting instructions to production about inserts or special characters — do not remove all highlighting at the end by setting the whole document to Highlight > No Color. Instead repeat Step 2, selecting No Color for the highlight, then do Steps 3 to 7 to remove highlighting from just the dashes and hyphens.
Got a gnarly Word problem? Submit your problem and we’ll try to answer it in the Q&A thread.
Previous posts showed you how to align table cells and numbers in columns using the ruler. It’s also possible to set margins, an indent, a hanging indent, and more on the ruler! Watch the demo at the end to see how, or just drag the related element where you want it.
With the cursor placed in a table, we can see table-specific elements on the ruler: a. the waffle marking the gutter or edge of a column, b. the left margin for the second (and subsequent) lines, c. the left margin, d. the first line left indent, e. a tab (left) mark, and f. the right margin.
To remove tab marks, just pull them off the ruler.
Note you want to do this for all affected lines at once; select the lines in the document before changing the ruler.
Troubleshooting
Can’t see the ruler? Select it in the Show group on the View ribbon.
If you can’t see the margin markers on the ruler, try Draft view and scroll wayyyyy over. Or, change which style that paragraph is in, then change it again (do not “undo”).
Moving the waffle that marks the column border changes only that column. The other columns stay as they were, so the right margin will get pushed around and may go outside of the page margins. Adjust all the columns until they sit right. (See also table resizing.)
Too many tab marks? Or, having trouble selecting them? Double-click on a tab mark to open the Tabs dialogue, then delete or change the tabs there.
Q: I keep resetting the width of a column in my table, but when my client opens it, the column snaps back to 6″ wide! The same thing happens to me if I open the file on another computer.
A: Ugh, this is a great example of why Word is not the best choice for document design. But, there are three settings you can change to try to stop the table from resizing at least until the file goes to layout. These options are not fail-safe, but they’re your best bet:
Table properties
Table options
Autofit settings
Table Properties
The usual culprit behind endless resizing is found on the Column tab in the Table Properties dialog. Open that by clicking the Properties icon on the (Table) Layout ribbon. Deselect the option that sets a preferred width. Make sure the cursor is placed in the offending column, first.
The (Table) Layout ribbon appears when the cursor is placed in a table. If your screen is wider, the icons at left where the Properties icon is found will be laid out in a line, no stacked.
Table Options
Deselect the “Automatically resize to fit contents” option? Find that from the Options button on the Table tab in the Table Properties.
Autofit Settings
Selecting “Fixed Column Width” (see pic) from the menu that opens when you click the AutoFit icon on the (Table) Layout ribbon.
Got a gnarly Word problem? Submit your problem and we’ll try to answer it in the Q&A thread.