Sometimes editors don’t want their work time-stamped, as MS Word does automatically when tracking changes or comments. Or the editor wants the “user name” removed from the tracked changes because they used someone else’s computer, for example. They don’t want the client thinking they outsourced the work without permission.
There are two ways to change the user name tags on comments and tracked changes. One method is to use the Compare Documents function, which lets you specify a user name for all the changes found between two documents, giving them all identical time stamps. We’ll talk about that more in another post.
When you’re working on a file, making edits and leaving comments, Word tags every change with your “name.” But is it really your name? Some computers will tag changes and comments with “Computer User”, and some will say gibberish like “adrn9bz”. Set up the system you’re using with your name, role, or business name to help everyone on the team decipher each person’s contribution and to build name recognition for your work.
Where to Find the Settings
You’ll find the “user name” setting in the preferences for Word 365 (Office 2016 or 2019 too).
On a Mac, it’s called User Information and is found in Preferences from the Word menu at the far left.
Windows users will find this setting in the Personalize your copy… section of the General “tab” in Options from the File ribbon. (File > Options > General > Personalize your copy…)
This name will appear on tracked changes and comments in all Office programs, and in the metadata relating to the creator or editor of the file.
Mac, Word 365
Windows, Word 365
Branding Tip
Use your business name or moniker if your name is long, like mine, or to remind the team of your business name every time they see one of your comments. Repetition is key to branding and to marketing.
Some clients will want to see your role as the user name, so the team knows which changes were suggested by Copyeditor and which were by The Big Boss. You can change the user name when working on their files. Just remember that the user name applies to all documents you work on from that point forward, not just their file.
It’s Not Working
There are three reasons
that setting the user name goes wrong:
It only works from this point forward. So it won’t change the “Author” tag on any existing changes. This is handy if you want to preserve others’ changes, but annoying if you only remember to change the name in the middle of your work.
The computer’s log in name will be used unless you check the little tick box below the field you entered your name in. You can see the “Always use this name/these values regardless of [how I’m] sign[ed] in to Office” box in the screen grabs above in this post. The wording is slightly different on each operating system just to irk editors.
The file is set to “remove personal info from this file on save.” That’s handy for dropping time stamps, but will completely scupper attempts to keep several reviewers’ input separate or to brand your work with your name. More on that in another post.
Some developmental edits require heavy lifting. If you’ve got to move sections of text, whole chapters even, you’ll love the convenience of the Navigation pane. Just click on a heading and you can move that whole section anywhere. Trick is, the document has to use Styles to set headings first.
A fox’s shortcut to food involves a head-first dive. Keyboard shortcuts are a tad easier.
Keeping your hands on the keyboard is a prime way to speed up work. The less you are hunting around ribbons and menus for the tool you need, the more efficient (and less frustrated) you’ll be. Learning existing shortcuts for navigating a document, cutting and pasting, etc. is an obvious way to keep your hands away from the mouse. Adding shortcuts for the things you do most is the productivity hack.
You can add a
keyboard shortcut for almost any command, without creating a macro. Below
you’ll find instructions for Windows users and Mac users. The core of the
method is customizing the keyboard, and finding the command you want within the
huge list of commands that are available.
Create a Keyboard Shortcut
Open the keyboard dialog:
On a Windows computer, right-click on a blank grey area of Word’s ribbon, then select Customize The Ribbon… from the context menu that pops up. Then, click the Customize… button beside Keyboard Shortcuts: at the bottom of the left-hand list.
On a Mac, select the Customize Keyboard… option at the bottom of the Tools menu.
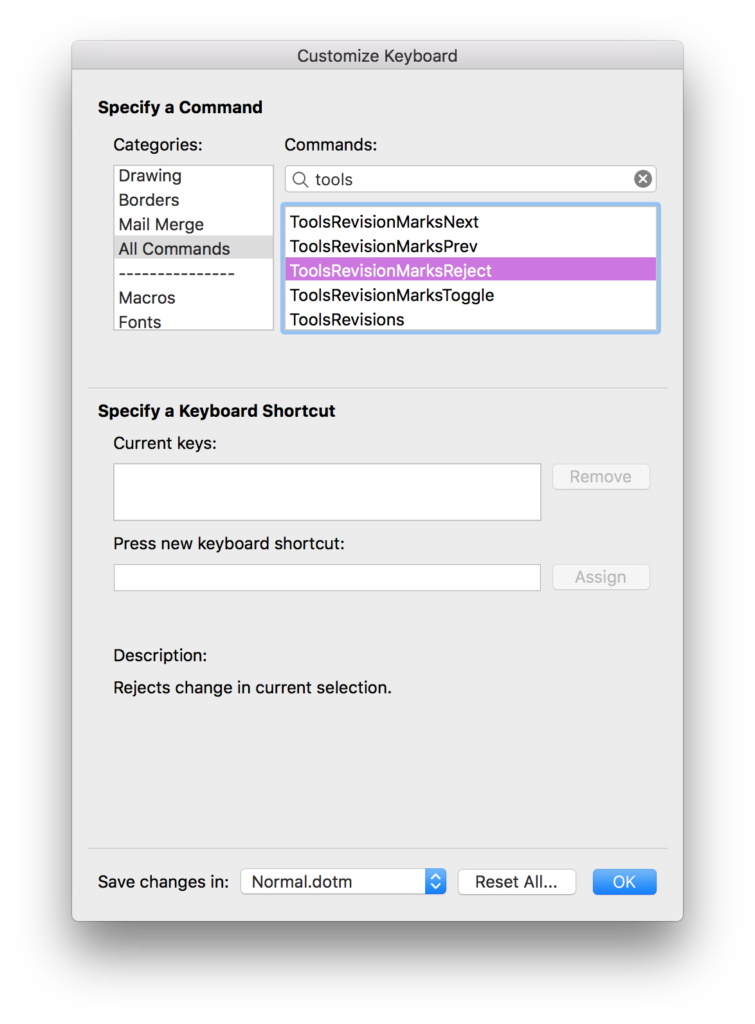
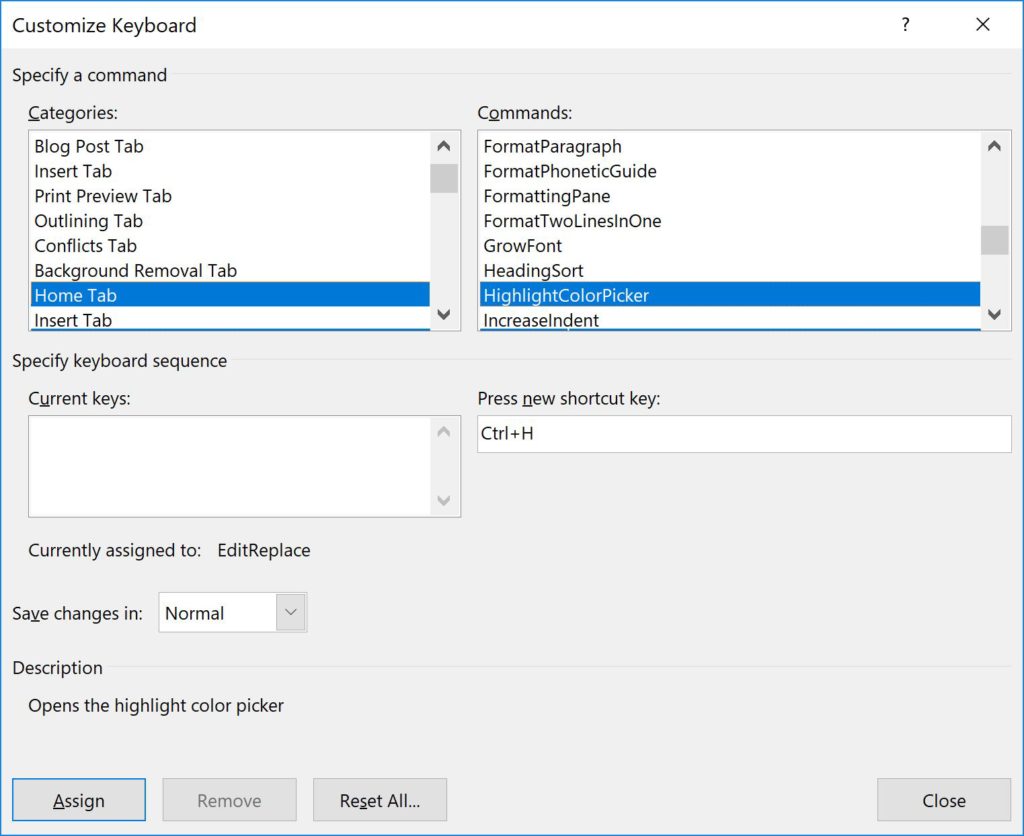
In the keyboard dialog box that opens, scroll down the left-hand list of Categories: and click a category to look in. Figure 1 shows the Mac and Figure 2 shows Windows.
Next, scroll until you find the desired command in the right-hand list of commands, then select it.
Click in the Press new keyboard shortcut field, then press the combination of keys you want to assign to this command.*
When you find a suitable key combination, click the Assign button, then OK.
*Note the text beneath the Press new keyboard shortcut field; it shows whether that key combination is already assigned. There are several dozen existing shortcuts and no online list seems to be thorough. You just have to try one. You can overwrite an existing shortcut just by doing the last two steps above. You might decide to “reassign” the shortcut for Close File since you always use Close Window, for example.
Figure 1 Mac Customize Keyboard dialog
Figure 2 Windows Customize Keyboard dialog
List Your Shortcuts
Remembering shortcuts can be challenging. If you go back into that keyboard dialog (Step 1 above), you can always look up a command (Step 2 and 3) and see what shortcut you assigned to it. It will be listed in the Current Shortcut field. Even better, keep a list in your work area. Periodically print out a list:
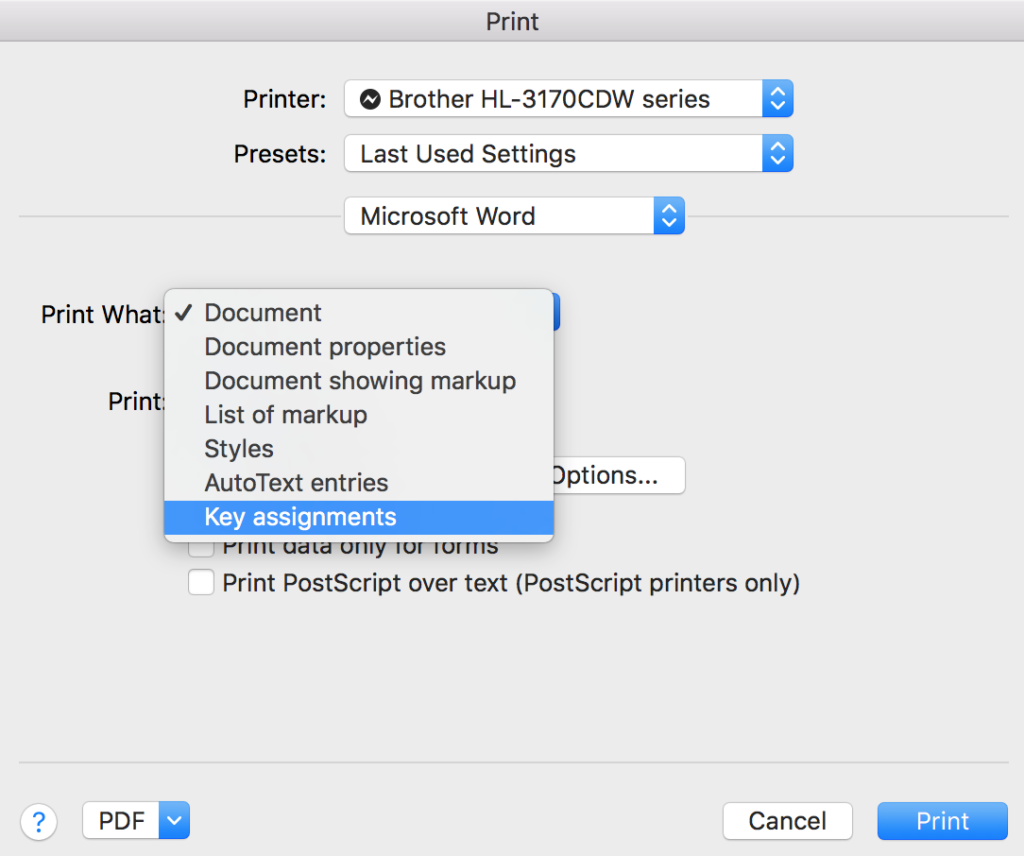
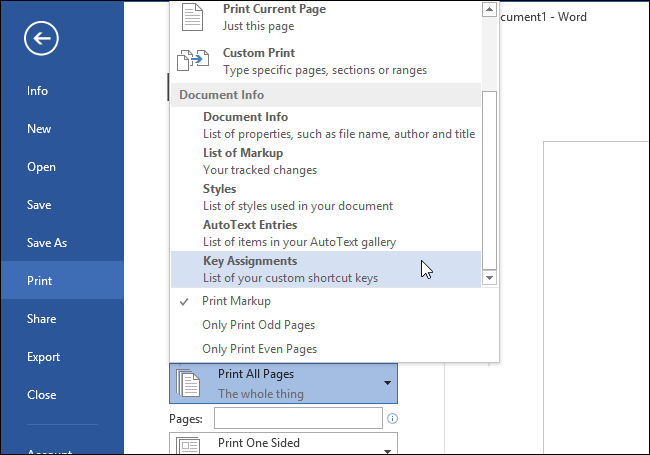
In any document, click Print to open the Print dialog. Select Word settings, and in the Print What drop-down, select Key assignments (Fig. 3 shows the Mac interface, Fig. 4 shows Windows, though these dialog boxes vary slightly on any computer, depending on your OS and your printer).
Figure 3 Mac Print dialog
Figure 4 Windows Print dialog
This only prints a list of the shortcuts you created, not those built into the system, such as those for Select All or Save.
Not only does Outline view in Word let you assess the structure of a document, it lets you move chunks of content with a click. On the View ribbon, click Outline in the Views group on the far left. Or at the far right of the document frame, click the icon on the bottom that looks like a bullet list (Figure 1). This displays the document as chunks of content, each marked by a square, minus or plus sign as shown in Figure 2. A plus sign means that there is content “within” that level. In the example, the Shortcut heading has no content “within” it but the List heading does.
Tired eyes, tiny type? Bump up the font size in the Reviewing pane to read Comments and tracked changes in MS Word with less strain.
The easiest fix is to change the zoom setting in the Reviewing pane. This doesn’t change the actual font size, but it makes it easier to read! Scroll down for video demos using classic Comments in Word 365 for Mac and for Windows. (See Troubleshooting, below.)
Zoom the Reviewing pane to increase the font size in Comments
These fast and accurate ways to select text
can revolutionize the way you work. Keyboard shortcuts are especially good when
precision is required to cut, copy, or style content, or when a very large chunk
is concerned. These shortcuts won’t jump unexpectedly like a mouse can.
Not only do these methods work in Word,
they work in most other software including WordPress, Adobe Acrobat, and other
content management systems. (Instructions for Windows users appear in brackets
if they’re different from the Mac instructions.)
Select the word the cursor is in, then the sentence, paragraph, or the whole document using this toggle repeatedly: fn + F8. To quit this mode, press escape.*
Select an entire sentence with cmd + click anywhere in the sentence. (In Windows: ctrl + click)
Select one word forward or back of the cursor’s position with shift + opt + right/left arrow. (In Windows: shift + ctrl + right/left arrow)
Select one paragraph forward or back with shift + opt + up or down arrow. (In Windows: shift + ctrl + down/up arrow)
Select a word with a double-click and the whole paragraph with three clicks.
*The fn key lets you access the root functions of the F keys that are now usually mapped to shortcuts like screen brightness and volume controls. If your F keys don’t operate computer functions, you may not have to press the fn key.
This excellent book on Microsoft Word that’s written specifically for editors. It includes step-by-step video tutorials that illustrate the skills the book goes over. I learned much more practical information about using Word effectively and efficiently as an editor in this book than in the copyediting certificate I just finished. It’s already paid for itself many times over in saved time. Highly recommend.
You read, you see, you learn, and then you do. There’s no better way to ensure it’s all sunk in. …This course is rammed with useful and actionable tips on how to get stuff done and in ways that respect your preferences. …Montgomerie takes the stress away via accessible walkthroughs that even the most tech-nervous of nellies will be able to follow.
I can highly recommend this self-study workbook from Adrienne Montgomerie. I’ve been editing in Word for more than five years and I picked up new tips and ways of working every time I opened this guide for a session. Still refer back to it now (my brain is the non-tech-retention type!). The beauty of this as a Word resource is that it’s written with editorial professionals in mind, so all the content was relevant to my working life.
Cally Worden
I consider myself a pretty advanced user of Word, but reading this book helped me pinpoint the areas where I could speed up my current editing workflow.