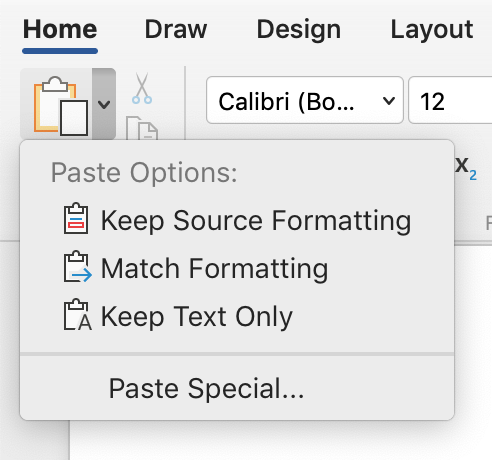
Not nearly as flavourful as that paste we ate in preschool, but maybe more useful, Word has several options for you to paste content with. Get at the the options from theribbon. Just click the little down arrow beside the Paste button on the left end of the Home ribbon to see the options.
They got rid of Clippy but not many of the other annoying automated features in MS Word. Automatic formatting is something that most editors want to turn off before they work. In fact, this is why turning off most automation is covered in the “Get Ready to Edit” section of the book.
When you get a document in which all of the URLs (web addresses) are blue and underlined, and active (hyperlinked), you’ll most likely want to remove them so they don’t cause design problems or (horrors!) end up in print. You can do this one at a time, or in one fell swoop (globally).
Font geeks love to debate readability and myriad other details about fonts. The other thing that matters when editing is being able to tell when the wrong character has been used. Font choice can cleverly conceal a wrong character hiding in a document: a 1 looks like an l, a superscript o looks like a °, an ‘ masquerades as a ′…
Times New Roman makes telling the difference between a 1 and an l nearly impossible. The superscript O versus the degree symbol is easier to spot; if you know what it should look like, that is.
The pink character in this word is actually the digit one. There are some indicators such as spacing and height, but it’s not easy to tell at usual working magnification.
Changing the font to one that shows a more drastic difference between characters is one solution. Some editors prefer to edit in Helvetica, Calibri, or Verdana for just such a reason. If you modify the font of the “Normal” Style, it’s easy to undo this font change before finalizing the file. The client will never know the trick that helped you spot those apostrophes that should be primes. Just turn off Track Changes when you change the font.
Verdana shows clear differences between the one and ell but if you didn’t know what a degree symbol (right) looked like, it might be easy for the superscript letter O to pass itself off.
You need more backup than hitting “save” every few minutes. You need a system that saves you from hours of redoing work because of a corrupted file or stolen computer. A thumb drive copy of working files is the absolute minimum you should have. Keep that backup in a separate and secure location, too.
The Backup Selections
The simplest solution is to back up everything, always. An archive of finished projects is the most old-school backup method (if permitted by your contract), but best practice is to back up all files on the schedule given here. This includes your business files (e.g., bookkeeping and marketing materials), and your email, calendar, contacts, and blog or website. Even back up your trash bin.
LFMF: I once wrote and deleted a whole chapter in a day. I couldn’t recover it when I reconsidered, because I did it between backups and I wasn’t backing up my trash bin. If your software isn’t a subscription, also back up your programs or applications folder. The wisest editors manually back up their macros too, as retrieving them from a backup file is a pain in the neck.
The Backup Schedule
Backup early and often, per this schedule of increasing intervals:
1 backup per hour for the last 24 hours
1 per day for 30 days
1 per week for the last year
1 per month older than one year
Destroy the oldest backup file when you’re out of storage space.
PRO TIP: Automated backup software (either built into your computer’s operating system or that comes with the backup drive you buy) uses a backup schedule something like this. The backup software also makes digging through backups easy.
Dispose of old backups with the same security measures you use for the backups that you keep. You have to be sure personal and proprietary information can’t be read by someone else.
The Backup Plan
Some editors save a backup file as they finish each chapter, giving it a new name. Others save a renamed file only at the end of each workday. Adding a descriptor such as “edited to Chapter 19” or “WIP” (for “work in progress”) helps keep these versions sorted. The cost of backup systems is now quite far below your hourly editing rate, so automating this process is highly cost effective as well as efficient and reliable. Many computers and external hard drives come with backup software built in, such as Apple’s Time Machine or Carbonite for Windows-based computers. Backup software can also work with offsite systems (including “the cloud”) rather than your own on-desk hard drive (e.g., Dropbox). Just be aware that anyone with access to a shared file might inadvertently delete that file from their (and everyone’s) system. That said, hard drives can also fail. Solid-state systems (such as SSD) appear to be more stable than the old technology of spinning disks. You can add space to a cloud backup system as you need it.
Whereas we used to keep every backup on a separate floppy disk, now they’re all on a single drive, making them vulnerable to a single failure; so consider having two drives that you swap every day or every week, depending on your risk tolerance.
The Location
There is no “cloud”—it’s just a hard drive in someone else’s building. Before storing backups in the cloud, consider restrictions stipulated in your work contract: The client may not allow you to store files offsite. They may prohibit foreign storage (common in government contracts), so find out where that cloud server is. They may also have security requirements such as physical locks, firewalls, encryption, and passwords. Though one advantage is that cloud services often have better system security than any one editor could afford.
LFMF: Ask if the location where the cloud server is based often loses power, such as on a storm-prone coast. Do they have emergency power, and backups of their own system?
If you keep backups in your own office, they are as vulnerable to theft and fire or water damage as your main computer is. A safety deposit box is physically secure offsite storage; even someone else’s office may be. At least put backups in a different part of your building, maybe in a fireproof safe. An old freezer can resist a lot of heat and water; that makes it a useful option for storing several hard drives or even laptops when you go away—just don’t plug it in.
The Insurance Plan
If your data is critical, follow the 3-2-1 rule: keep three copies of all data—two locally, on different media, and one copy offsite.
Quality check the backup system often. Verify its CIA: confidentiality, integrity, and availability. Is it protected? Is it working as planned? Are files undamaged? Can you get a file when needed? Is there more than one way to get at files? The nightmare these checks avoid is finding out the system hasn’t been working, just when you need it most.
PRO TIP: Use antivirus software and clean the system often. The last thing you want is to reactivate a virus when you access an archived file.
Your manuscript just came back from the copyeditor or proofreader. Now what?
After you freak out over all the mark-up, tell yourself this is typical for professional writing, take a breath, and roll up your sleeves.
It’s time to check the changes the editor made, answer their questions, and clear up any remaining issues. The file will probably go back to the editor for some final clean up. If it doesn’t, you have to clear ALL markup to make it ready for the printer/ production department.
There may be a lot of work left. This is typical and does not mean the writing is terrible. Even if an editor wrote it, she could expect as many edits on her work; writing is like that. Addressing edits takes an average of 1 hr per 2500 words, so settle yourself in and let’s go.
The powerful Find and Replace function is one of the reasons editors still prefer using Word for editing documents. Despite the endless program crashes, and all the fails listed here, the power of wildcards and special characters (regular expressions) in Word just isn’t matched by Google Docs, Pages, or any of the myriad alternative programs our clients try to get us to use.
Yet anyone who earns a living using Word can tell you it lets them down in spectacular ways. Knowing some of the ways a Find and Replace effort will malfunction not only lets you be aware that Word may not have your back, but lets you avoid these problems too:
Word’s “autocorrect as you type” feature can be used as a built-in text expander to save you thousands of keystrokes over a single day. Here are ten suggestions to get you started.
your initials → your full name
ph → your phone number
e[ → your email address
abb → abbreviation
a[ → AU: Change ok?
x space → ×
/ space → ÷
c/ → ¢
cite → AU: Please add a complete citation for this quote to the references.
wtf → AU: Can you explain this to me another way so that I may suggest an edit for clarity?
Once you’ve started entering these “shortcuts” you’ll start noticing other times that an expander can be put to use. Maybe it could enter your mailing address, or the entire intro text for a file transmittal message!
This is also where you’ll find that (TM) turns into a proper ™️ symbol, and more!
When someone’s name becomes legendary — becomes a verb, even — it can be a surprise to learn they had “another life”; a life beyond that singular fame. The editing world lost such a star this weekend; someone we have come to revere for the Word tip she shared, it was that valuable. And in Maggie Secara’s sudden passing, we learned she was a rounded woman, not just the namesake of a sanity-saving computer trick.
Maggie’s Clever Hack
If you’ve needed to resuscitate a problematic Word document, you’ve probably done “a Maggie.” Copying everything but the final pilcrow into a fresh Word document breathes hope into files that seem beyond redemption because Word saves a hoard of information in that last hidden character. And that hoard can cause Word to crash or fail, again and again. Omitting the final pilcrow purges the problematic hidden code.
“To Maggie” isn’t a technical term that Microsoft recognizes. This name arose in honour of this woman who popularized the process by sharing it repeatedly in an online forum for Word users.
Getting to Know Maggie
“Is that you?” Maggie Secara often got asked. “Yeah, that’s
me,” she’d say. “What can I say? I’ve never been a verb before.”
Though Maggie proved to be mere mortal, she is remembered for a surprising array of talents. I knew her as a technical writer and novelist, but many are speaking to her enthusiasm for things renaissance. In fact, if you’re working on something set in that era, you’ll find her book invaluable for fact checking: A Compendium of Common Knowledge 1558-1603.
Maggie’s writing and editing work took her so deeply into MS Word software, that she became an uber-user. She picked up the pilcrow-excluding file remedy in one of the user forums and shared it whenever it could help. One day, the planets seemed to align (nefariously) and several people had problematic Word files at once. Maggie explained this solution so often that others in the forum began asking: “Did you Maggie it?” The new term spread beyond that forum when one person spoke of it at a conference.
Since then, Maggie’s legend spread to other
forums and to the editing community at large. “The Maggie” has recovered
innumerable files from snafu, and saved almost as much sanity.
Rest in peace, Maggie. If only we could take back your final pilcrow.
If all the tracked changes and comments are being shown as being made by “Author”, the document probably has been set to remove all personal data on save. This setting is sticky, so it keeps removing all data upon every save. You have to turn that off to get your name to stick.
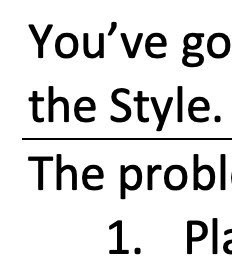
You’ve got a line
under a paragraph that you can’t get rid of. You’ve checked underlining and the
Style. You’ve deleted the final hard return, the pilcrow mark. But the line
persists.
The problem is likely
a border. Getting rid of it can be easy:
Place the
cursor in the offending paragraph.
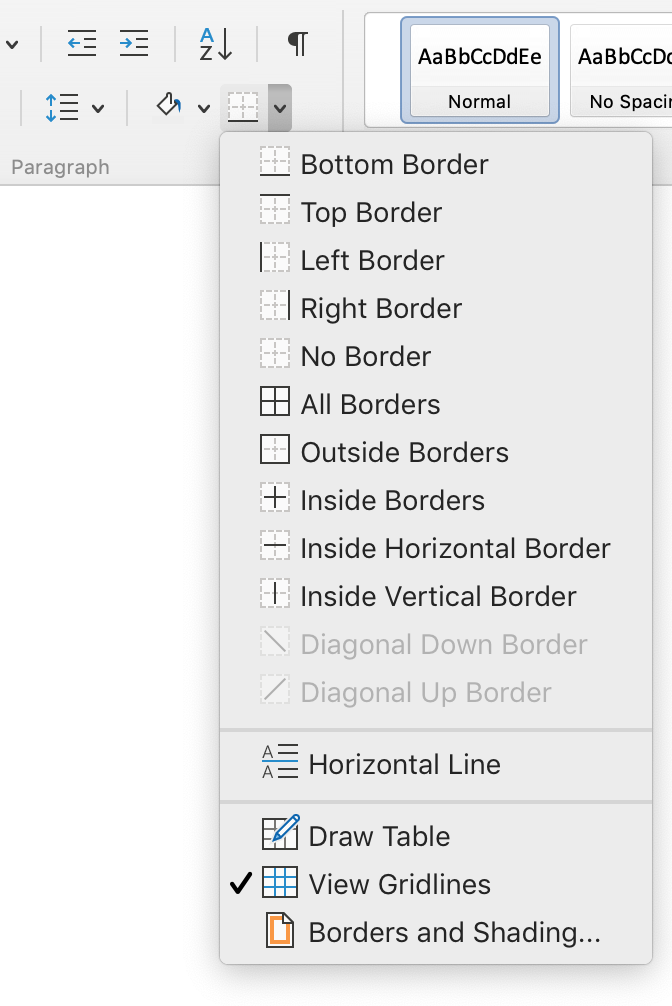
On the Home
ribbon, look in the Paragraph group for the little grid, below the pilcrow
icon.
Click the
little down arrow on the right side of that grid icon.
Deselect
Bottom Border.
Troubleshooting
It might be a Top Border, if deselecting Bottom Border didn’t work, try placing the cursor in the paragraph below the line, then deselecting Top Border.
If the line keeps coming back, or is applied to every paragraph, check the Style settings for that text (usually Normal). The border may be specified right in the Style so Word keeps reapplying it, “helpfully.”
It’s possible to Select All of the document and deselect the border for all text in the document. This will also affect tables in the text but will not change the Style settings, so lines may appear in new paragraphs.