Track Changes is a feature of Word that lets each person on the team show their suggested revisions and leave comments “attached” to content without becoming part of the content itself (and thus avoiding the disastrous embarassement of comments making it into the final product).
Download this 132 kb file, then try the steps below. Check your work against the answer figure shown at the end.
You already know how to remove all pictures from a file in a single click, but what if you need to keep those images in place? Checking visual content is a key editorial task, after all. Or what if the Word file is producing the output so the pictures are required? Many reports and ebooks are designed in Word!
Word files can get bloated, taking up far more MB than they should. If you’re dealing with a book-length manuscript full of tracked changes and comments, that bloat can bog down the computer and lead to failures, glitches, and basic Office malfeasance.
Selecting unwieldy content doesn’t have to be a snafu experience.
You know that ctrl + A will “select all” contents of a Word file, but did you know that selecting less — large amounts but not all contents — can be as easy? No need to drag the mouse, jumping unexpectedly and far; it doesn’t have to be a tedious, glitchy, or imprecise experience. Just use one of these methods:
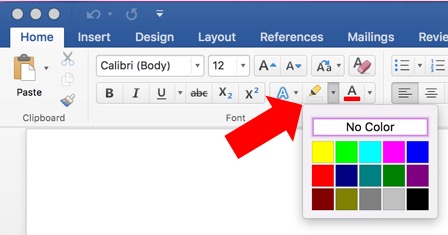
The highlighter is found on Word’s Home ribbon. Click the little down arrow to open the colour selection panel.
Highlighting jumps off the page as you scroll past, alerting you to content that needs attention. But you can also search for highlighted text, making it a useful “fail safe” (if not entirely safe from failing) as a final check for things left to be done such as fact checking.
Uses for the Highlighter
Highlighting has uses far beyond a study technique. In editing and production workflows, they can be used to
That little tab key on your keyboard is excellent for moving between table cells or elements on a form. It can be used to align decimals in a list, and to create blank lines on forms. But never, NEVER, use tab marks instead of format settings. First, here’s how to reveal the tab marks.
Never use tabs to
Manual alignment using tabs creates a mess. Luckily, once you recognize it, getting rid of extra tabs is easy using find and replace. Then, apply numbered list style for proper (automatic and reflowable) alignment!
Tab marks don’t let text reflow when anything changes! Someone will have to manually realign everything if they change the font type, font size, page/column margins, or even punctuation.
Use tabs marks to
On the rare occasion, tabs are great layout aids. But if you’re typing a tab mark mid sentence, or using more than one tab mark, you’re most certainly doing it wrong and creating headaches for everyone down the road. The best use of tab marks are to:
Double-click a tab mark on the ruler or select Tabs from the Format menu to open these settings.
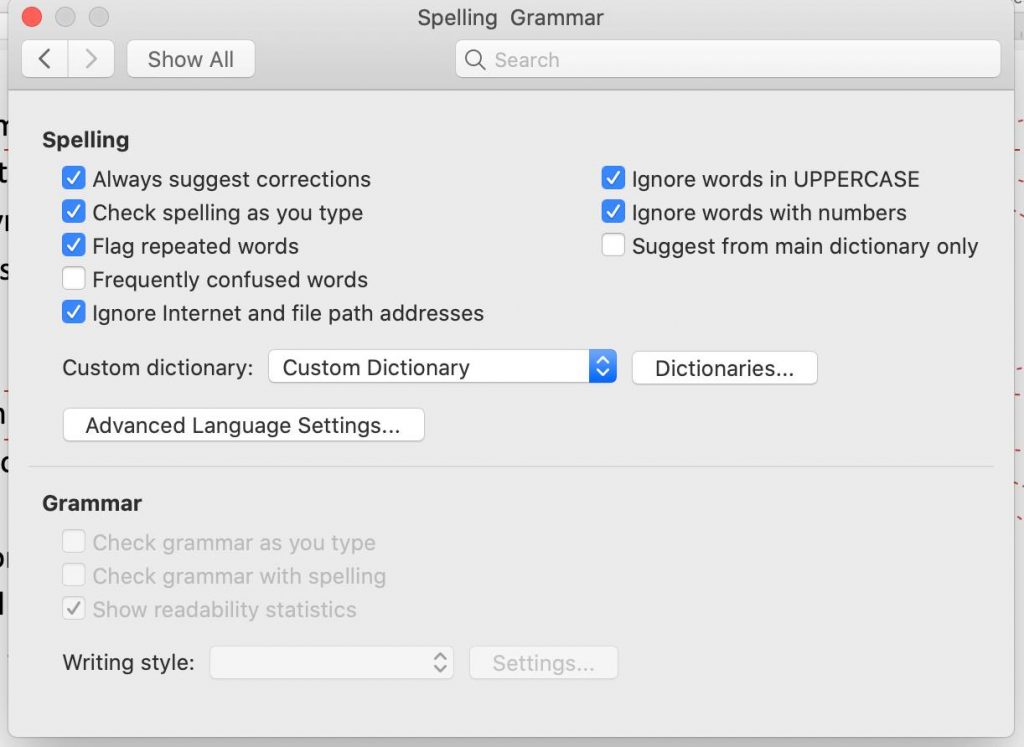
QI’m using MS Word for Mac, Office 365 subscription, and for some reason grammar check is greyed out. I can’t figure out how to turn it on. Any ideas? Google search just tells me to put in on in the preferences, but that is where it’s greyed out. The language is set for English (US), so it shouldn’t be that. Thanks!
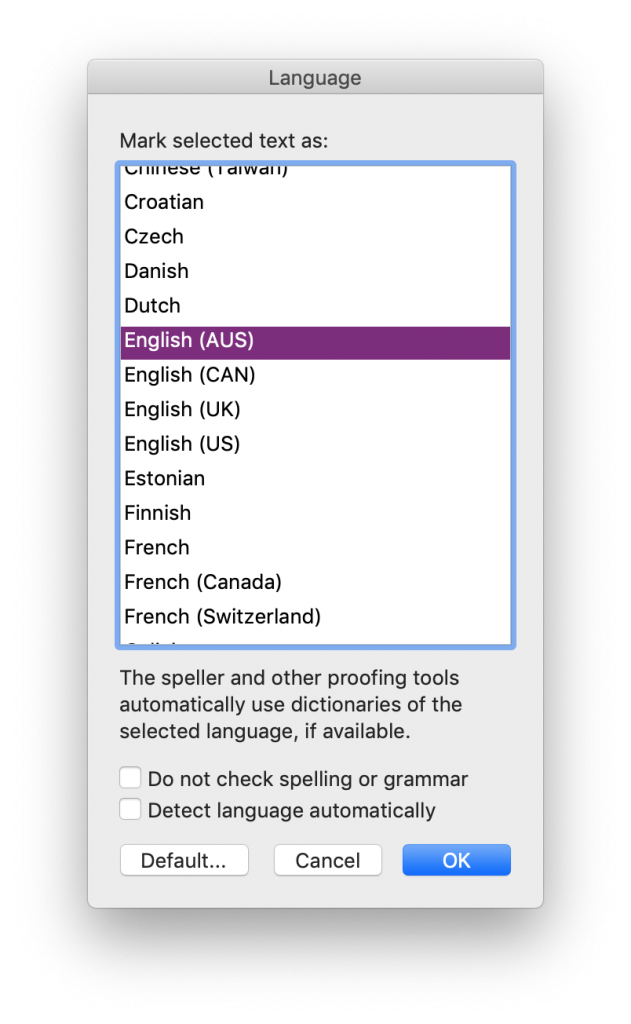
ACheck the language settings in the Style setting of that text. If it is set to a language whose dictionary is not installed, the Grammar check options won’t be available.
While the grammar checking aspect of the (newly termed) Editor is improving, one of the most useful aspects of this tool is the reading level assessment (readability statistics) it can provide at the end of the process. For more on reading levels assessments, see this other blog post.
Troubleshooting
Check all of the styles used in the document.
Learn more about Styles starting on page 59 of the self-study book and about Language settings on page 27.
Be sure to click on the desired language and click OK. Just because it’s listed at the top doesn’t mean that a language is selected.
In the Style’s settings, ensure that the “Do not check spelling and grammar” option is NOT checked off/ticked/selected.
Save and close the document if this change doesn’t work at first. Close and reopen Word, too.
Got a gnarly Word problem? Submit your problem and we’ll try to answer it in the Q&A thread.
The good news is that Google Docs plays well with Word, now. The bad news is that this requires you to (and only works if you do) export the document into a Word file, work on it, and then re-upload it to Google Docs when you are done.
I’ve let a couple of my editing students use it (for reasons) and am thrilled to find that Google Docs now produces great markup of the Tracked Changes and Comments when it makes a Word file. It also maintains my markup and comments from Word when I reupload it to Google Docs!
I still do better, faster editing work by using all my macros, plug-ins, and dozens of other customized tools in Word, so this compatibility is very hopeful news.
Markup Using Google Docs
The Suggesting feature in Google Docs marks up text much like Word does with Track Changes and Comments. The reason you want to use this is not only so that the changes stand out for review and can be easily accepted or rejected and so that comments are easy to find. More importantly, by leaving “suggestions” and tracked changes, you avoid having your comments and other infelicities end up in the final product because someone missed deleting them! This has happened many times and it is always an enormous embarrassment as it’s shared widely across the internet.
In Google Docs, click on the speech bubble icon at the top right of the screen. This opens the small menu shown in the image below. Click the Suggesting option to turn on the tracking mode. Then, type additions and delete text without further concern—they will be tracked. Add comments by clicking the speech bubble icon with the plus—the one just to the left of the pop-down menu in the example below.
Troubleshooting
Do not let the writer keep working on the Google Doc while you are editing in Word. These are now two separate versions of the file—the on in GDocs and yours in Word—and their changes will not be incorporated into your edits. You’ll be uploading a new version, separately, since you can’t upload–convert into an existing Google Doc. Ideally, you will lock the old Google Doc from further changes.
At minimum, add in a very large, colourful font at the top of the original Google Doc reading: DEAD FILE. Changing the colour and font family of the body content would also give visual signals that it is not the file to work on. Also change the doc’s name to include the words dead file.
While you might be frustrated by the seemingly endless updates (changes) to Microsoft products, Google Docs updates even more often. So what I say here may be out of date by the time you read it. So far, Google Docs keeps getting better and more functional. So let’s hope that’s what you find.
Styles and internal cross-references do not get carried over elegantly from Word to Google Docs. Just be aware of this, and plan on fixing the flubs in production/layout.