
Remember that satisfying gear-wind and ding of shoving the carriage return back to the left of the page at the end of every line? Some writers do! But Word is not a typewriter. There should be a little pop-up confirmation box when a writer tries to hit the return key at the end of every line. And if they try to hit it twice to create double spacing, a captcha should pop-up, asking if they really want to insert two manual paragraph breaks.
Continue reading Eliminate Paragraph Breaks at the End of Every Line With This Find & Replace SequenceTag Archives: Word 365
Word’s Style Gallery

Along the Home ribbon, if the window is wide enough, you can see several Styles for words and paragraphs. Unlike the font and size selections at the left edge of the ribbon, Style sets standard attributes for each kind of text: normal, body, headings, footers, and even comment balloons. And those attributes can be changed throughout a document with a single modification to the style.
Continue reading Word’s Style GalleryFix Extra Line Spaces

Extra line spaces in a manuscript create layout problems. Whether they were used to create paragraph spacing or start a new page, manual line spacing just isn’t the best practice. What works more elegantly in the workflow is setting the paragraph spacing and using manual page breaks. But first, get rid of those extra line breaks and hard returns!
Just like the extra spaces in last week’s post, there’s no reason to be hunting and destroying extra line spaces by eye, one at a time. With a simple find and replace, MS Word can rid the file of these unwanted artifacts with just a click (or two).
Easy Steps to Rid the Manuscript of Unneeded Line Spaces
Continue reading Fix Extra Line SpacesTurn Double Spaces into Single with Just a Click

Whether it’s a holdover from the old days or someone following APA’s guide from a few years ago, every editor will eventually see a manuscript that has two spaces after every period. Because modern layout software handles sentence spacing better than typewriters did, these double spaces are no longer necessary and can, in fact, create weirdly large spacing. One of the routine things an editor (or compositor) does is strip out those double spaces. But there’s no reason to be doing this by eye, one at a time. With a simple find and replace, MS Word can rid the file of these ancient artifacts with just a click.
How to Turn Two Spaces into One
Continue reading Turn Double Spaces into Single with Just a ClickFinding Imposters: Degrees
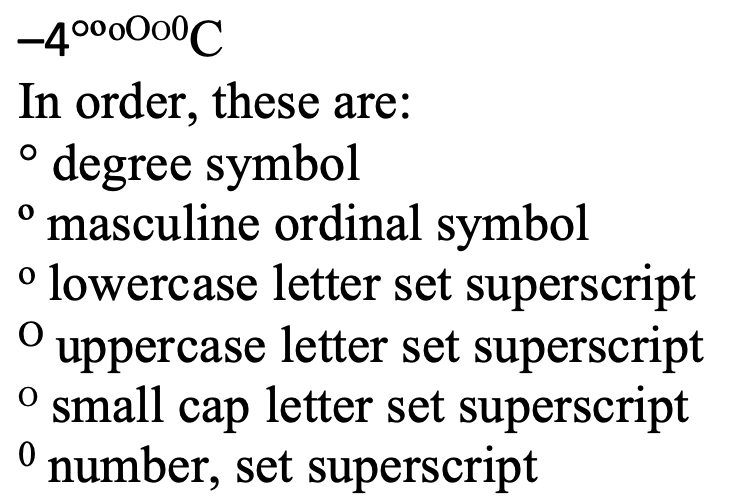
The degree symbol is used for angles and arcs, temperatures, and the ‘proof’ of alcohol, among other things. You’ll even find it in harmonics. It started as a raised glyph of the digit 0, but best practice in typesetting and design now is to use a true degree symbol designed for the purpose.
The degree symbol is preferred because many fonts style the alternatives in ways that make them look very out of place as a degree symbol.
To Type the Degree Symbol
Continue reading Finding Imposters: Degrees5 Uses for a Non-Breaking Space
A non-breaking space has intentional and side benefits:
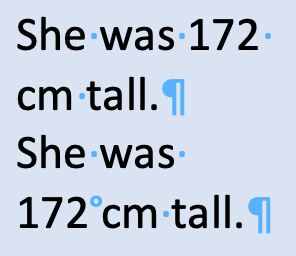
- Keep digits with their unit of measurement.
- Keep names from splitting over a line break.
- Keep long numbers from splitting over a line break.
- Identify content copied from a PDF or website.
- An easily searchable character for your compositor to replace.
To Find Non-Breaking Spaces
You don’t have to rely on your eyes alone. In the Find field, type ^s to search for non-breaking spaces. You can even pair this code with wildcards to quickly add non-breaking spaces between all digits and their units of measure, or in place of simple spaces in long numbers.
Compositors and others on the design team can use the non-breaking space as a placeholder for another character, often the thin space which Word cannot produce but which makes for elegant text design.
To Type a Non-Breaking Space
On a Mac: opt + spacebar
In Windows: ctrl + shift + spacebar
Troubleshooting
It’s not just plagiarism that makes an editor look for text copied from elsewhere. The non-breaking spaces in such pasted content can really mess up layout. I see these a lot in article titles in the bibliography or reference list. By changing those to regular spaces, we can save a lot of fixing in page proofs.
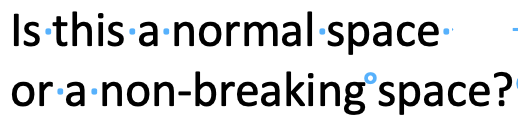
To show or hide these spaces and all non-printing characters, click the ¶ icon on the home ribbon.
A non-breaking space sometimes goes by the name of a fixed space or a hard space.

How to Get a Word Count from a PDF using Word
Whether you need a word count for estimation or billing purposes, or for something else entirely, MS Word comes to the rescue. There are two easy ways to get text from a PDF into Word:
- Paste the contents into Word
- Open the file in Word
Pasting text into Word is simplest, but it doesn’t work with every file type. To get the whole contents of a slide set, for example, first print the slides to PDF, then copy all from that new file.
- Open the file
- Select all (ctrl + A, or cmd + A on a Mac)
- Copy
- Open Word and Paste
Open Word, then tell it to open the PDF. Word will convert the PDF and the Word count will appear along the bottom edge of the screen.
Troubleshooting

It may take a few seconds for Word to do its count; just wait. If it seems stalled, scroll down a few pages or go right to the end.
Word can make all kinds of errors detecting the text in a PDF, especially if that PDF was a scan rather than a “print” of an original file. (Misread ligatures and insert spaces mid-word.) Word will also include all of the markups and notes made to the PDF, and if those notes overlap text, that text will be excluded. Body text from a marked-up PDF is best gotten into Word by the copy–paste method.
This captures the running feet and heads too. If the word count needs to be precise, do a search-and-destroy for those.
Yes, you can export a slide set as an RTF, but we’re talking PDFs here.
Got a gnarly Word problem? Submit your problem and we’ll try to answer it in the Q&A thread.


Learn with us! Join a course today.

© This blog and all materials in it are copyright Adrienne Montgomerie on the date of publication. All rights reserved. No portion may be stored or distributed without express written permission. Asking is easy!
Sort to Find Duplicates
Right on the Home ribbon in MS Word you’ll find a Sort button. It’s handy for alphabetizing, to be sure, but you can use this as a hack to find duplicates in a bibliography too.
Some bibliographic styles list references in the order they are mentioned within the body of the text. This means they’re in 1, 2, 3 order rather than alphabetized by author name. Especially when a text is team written, duplicate entries can happen, and they’re hard to find when the bib or refs list is long.
Sort, to the rescue! With a couple steps, first. Watch the demo video or follow the 3 easy steps below.
- Copy the reference list to a new doc, but when you paste, select Keep text only from the options in the Paste icon on the Home ribbon.
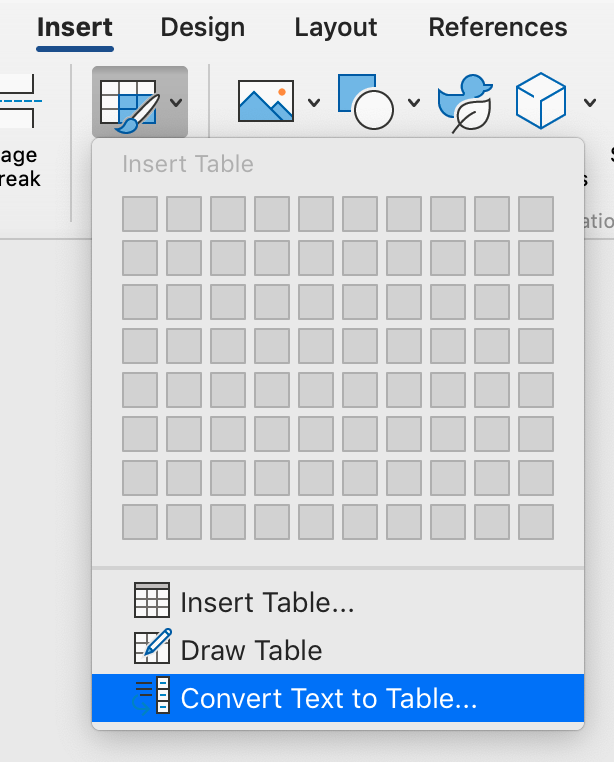
- Select all, then select Convert Text to Table either from the menu, as shown in the demo, or from the ribbon as shown in the image below.
- Place the cursor in the table, then select the A→Z sort icon on the Home ribbon (beside the ¶).
- Tell Word to sort by column 2, and you’re ready to skim the list for duplicates.
This sort trick can also help you spot small inconsistencies in author names, such as Department for defence vs Department of defence.
Troubleshooting
- Do this in a new document, so you don’t mess with the formatting of the original.
- To maintain the auto numbering in the original document, make your changes by hand rather than pasting a revised list back into the original.
Never miss a Word-Wrangling Wednesday tip. Sign up to get them by email. By practicing one tip each week, you can invest 13 hours this year into professional development. To search the blog, use the red-orange bar just above this paragraph.

Want more productivity boosters? Turbo boost your skills and get Word to do the heavy lifting for a change.
Buy the full self-study course and get 115 pages of editor-specific instructions for making the most of MS Word 365. Includes dozens of demo videos for both Mac and Windows users. Field tested since 2011 with editors around the globe.
Got a gnarly Word problem? Submit your problem and we’ll try to answer it in the Q&A thread.

Quick Change: upper- to lowercase, and more
Has your writer used all uppercase letters “for legibility”? Did they use them liberally for emphasis? Fix it all with a click (or 3):
- Select the text to change, then
- click the Change Case icon on the Home ribbon and
- select the preferred style.
Curly Quote Catches

They look nice, and some would say they facilitate reading ease. But curly quotes can cause snafus with macros, wildcards, and content management systems (CMS) like online education interfaces and website back ends. And sometimes Word just doesn’t want to create a mark with the right curl. Here’s how to fix those snags.
Correcting the Curl
If your quotes (or apostrophes) are simply facing the wrong way, the easiest thing to do is type a second mark beside it then erase the wrong one. Or, use one of the keyboard shortcuts listed in the table below. Alt codes work on both operating systems but Mac users may have to turn on the alt codes (or even the unicode) keyboard first. Windows users should type the first two keys together, then press the keys that follow the comma.
| Alt Code | Mac | Windows | ||
| ‘ | opening single quote | alt + 0145 | opt + ] | ‘ |
| ’ | closing single quote | alt + 0146 | opt + shift + ] | ctrl + ‘, ‘ |
| “ | opening double quote | alt + 0147 | opt + [ | shift + “ |
| ” | closing double quote | alt + 0148 | opt + shift + [ | ctrl + ‘, shift + “ |
Solving F&R Errors
If your find and replace string isn’t working, or it is royally messing up the manuscript, try replacing all the curly quotation marks with straight ones before you run the F&R. Then change them back.
You can read about how to easily change them in this other post.
Got a gnarly Word problem? Submit your problem and we’ll try to answer it in the Q&A thread.
Learn with us! Join a course today.
© This blog and all materials in it are copyright Adrienne Montgomerie on the date of publication. All rights reserved. No portion may be stored or distributed without express written permission. Asking is easy!