Font geeks love to debate readability and myriad other details about fonts. The other thing that matters when editing is being able to tell when the wrong character has been used. Font choice can cleverly conceal a wrong character hiding in a document: a 1 looks like an l, a superscript o looks like a °, an ‘ masquerades as a ′…
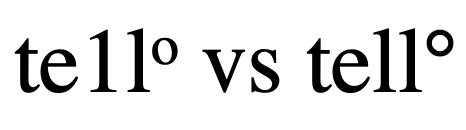
Times New Roman makes telling the difference between a 1 and an l nearly impossible. The superscript O versus the degree symbol is easier to spot; if you know what it should look like, that is.
The pink character in this word is actually the digit one. There are some indicators such as spacing and height, but it’s not easy to tell at usual working magnification.
Changing the font to one that shows a more drastic difference between characters is one solution. Some editors prefer to edit in Helvetica, Calibri, or Verdana for just such a reason. If you modify the font of the “Normal” Style, it’s easy to undo this font change before finalizing the file. The client will never know the trick that helped you spot those apostrophes that should be primes. Just turn off Track Changes when you change the font.
Verdana shows clear differences between the one and ell but if you didn’t know what a degree symbol (right) looked like, it might be easy for the superscript letter O to pass itself off.
Word’s “autocorrect as you type” feature can be used as a built-in text expander to save you thousands of keystrokes over a single day. Here are ten suggestions to get you started.
your initials → your full name
ph → your phone number
e[ → your email address
abb → abbreviation
a[ → AU: Change ok?
x space → ×
/ space → ÷
c/ → ¢
cite → AU: Please add a complete citation for this quote to the references.
wtf → AU: Can you explain this to me another way so that I may suggest an edit for clarity?
Once you’ve started entering these “shortcuts” you’ll start noticing other times that an expander can be put to use. Maybe it could enter your mailing address, or the entire intro text for a file transmittal message!
This is also where you’ll find that (TM) turns into a proper ™️ symbol, and more!
When someone’s name becomes legendary — becomes a verb, even — it can be a surprise to learn they had “another life”; a life beyond that singular fame. The editing world lost such a star this weekend; someone we have come to revere for the Word tip she shared, it was that valuable. And in Maggie Secara’s sudden passing, we learned she was a rounded woman, not just the namesake of a sanity-saving computer trick.
Maggie’s Clever Hack
If you’ve needed to resuscitate a problematic Word document, you’ve probably done “a Maggie.” Copying everything but the final pilcrow into a fresh Word document breathes hope into files that seem beyond redemption because Word saves a hoard of information in that last hidden character. And that hoard can cause Word to crash or fail, again and again. Omitting the final pilcrow purges the problematic hidden code.
“To Maggie” isn’t a technical term that Microsoft recognizes. This name arose in honour of this woman who popularized the process by sharing it repeatedly in an online forum for Word users.
Getting to Know Maggie
“Is that you?” Maggie Secara often got asked. “Yeah, that’s
me,” she’d say. “What can I say? I’ve never been a verb before.”
Though Maggie proved to be mere mortal, she is remembered for a surprising array of talents. I knew her as a technical writer and novelist, but many are speaking to her enthusiasm for things renaissance. In fact, if you’re working on something set in that era, you’ll find her book invaluable for fact checking: A Compendium of Common Knowledge 1558-1603.
Maggie’s writing and editing work took her so deeply into MS Word software, that she became an uber-user. She picked up the pilcrow-excluding file remedy in one of the user forums and shared it whenever it could help. One day, the planets seemed to align (nefariously) and several people had problematic Word files at once. Maggie explained this solution so often that others in the forum began asking: “Did you Maggie it?” The new term spread beyond that forum when one person spoke of it at a conference.
Since then, Maggie’s legend spread to other
forums and to the editing community at large. “The Maggie” has recovered
innumerable files from snafu, and saved almost as much sanity.
Rest in peace, Maggie. If only we could take back your final pilcrow.
The pilcrow has marked the end of a paragraph since long before there were computers. The little backwards ¶ today is found hiding in documents, storing vital format information, and marking paragraph breaks.
Click the little pilcrow (¶) on Word’s Home ribbon to see all the behind-the-scenes formatting marks that make documents look good. But what are those marks? See the table for a list.
Some developmental edits require heavy lifting. If you’ve got to move sections of text, whole chapters even, you’ll love the convenience of the Navigation pane. Just click on a heading and you can move that whole section anywhere. Trick is, the document has to use Styles to set headings first.
A fox’s shortcut to food involves a head-first dive. Keyboard shortcuts are a tad easier.
Keeping your hands on the keyboard is a prime way to speed up work. The less you are hunting around ribbons and menus for the tool you need, the more efficient (and less frustrated) you’ll be. Learning existing shortcuts for navigating a document, cutting and pasting, etc. is an obvious way to keep your hands away from the mouse. Adding shortcuts for the things you do most is the productivity hack.
You can add a
keyboard shortcut for almost any command, without creating a macro. Below
you’ll find instructions for Windows users and Mac users. The core of the
method is customizing the keyboard, and finding the command you want within the
huge list of commands that are available.
Create a Keyboard Shortcut
Open the keyboard dialog:
On a Windows computer, right-click on a blank grey area of Word’s ribbon, then select Customize The Ribbon… from the context menu that pops up. Then, click the Customize… button beside Keyboard Shortcuts: at the bottom of the left-hand list.
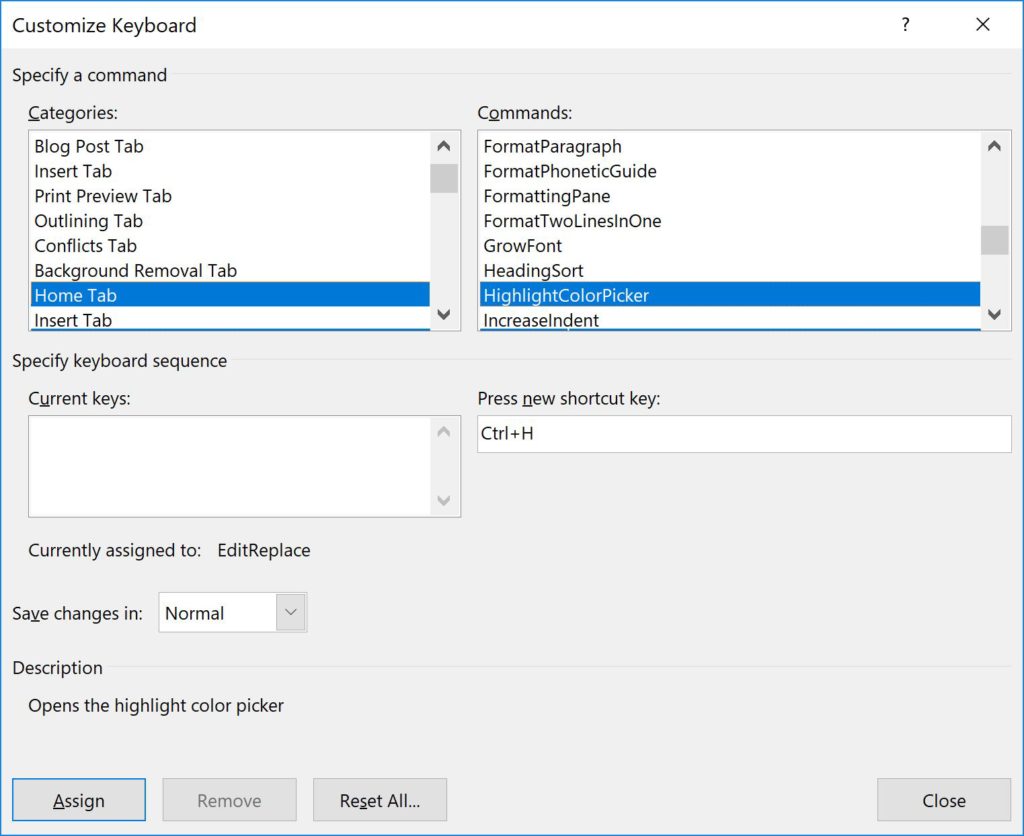
On a Mac, select the Customize Keyboard… option at the bottom of the Tools menu.
In the keyboard dialog box that opens, scroll down the left-hand list of Categories: and click a category to look in. Figure 1 shows the Mac and Figure 2 shows Windows.
Next, scroll until you find the desired command in the right-hand list of commands, then select it.
Click in the Press new keyboard shortcut field, then press the combination of keys you want to assign to this command.*
When you find a suitable key combination, click the Assign button, then OK.
*Note the text beneath the Press new keyboard shortcut field; it shows whether that key combination is already assigned. There are several dozen existing shortcuts and no online list seems to be thorough. You just have to try one. You can overwrite an existing shortcut just by doing the last two steps above. You might decide to “reassign” the shortcut for Close File since you always use Close Window, for example.
Figure 1 Mac Customize Keyboard dialog
Figure 2 Windows Customize Keyboard dialog
List Your Shortcuts
Remembering shortcuts can be challenging. If you go back into that keyboard dialog (Step 1 above), you can always look up a command (Step 2 and 3) and see what shortcut you assigned to it. It will be listed in the Current Shortcut field. Even better, keep a list in your work area. Periodically print out a list:
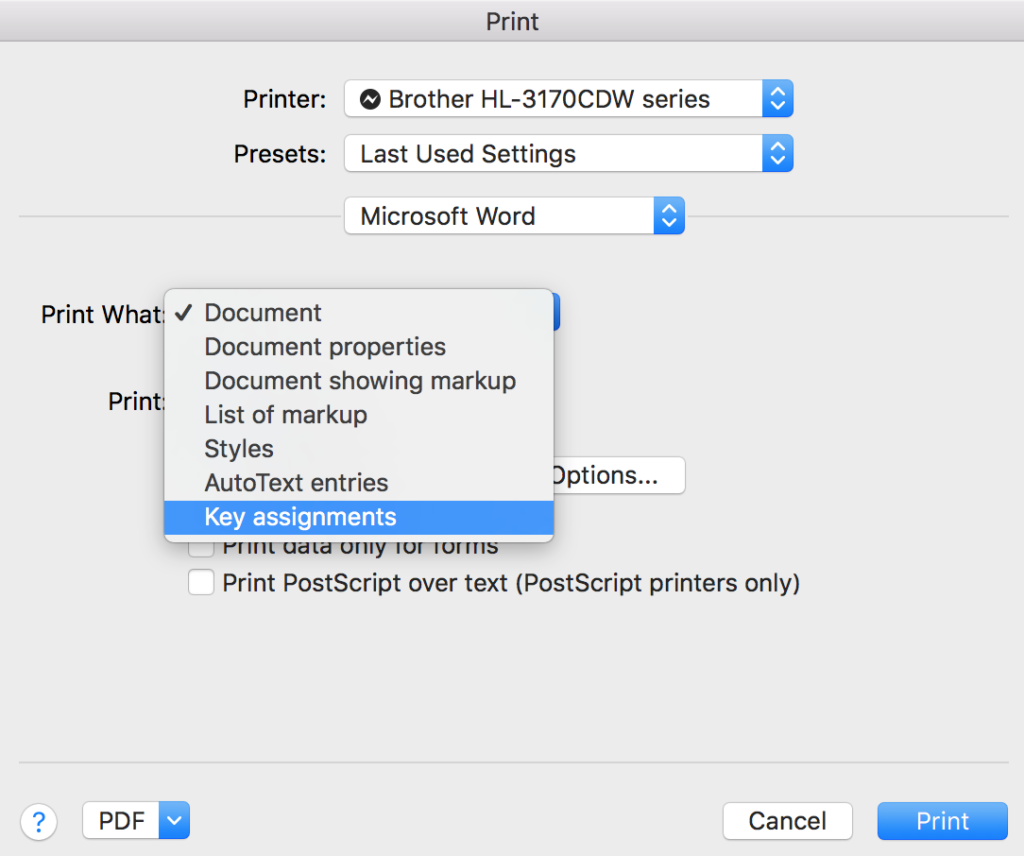
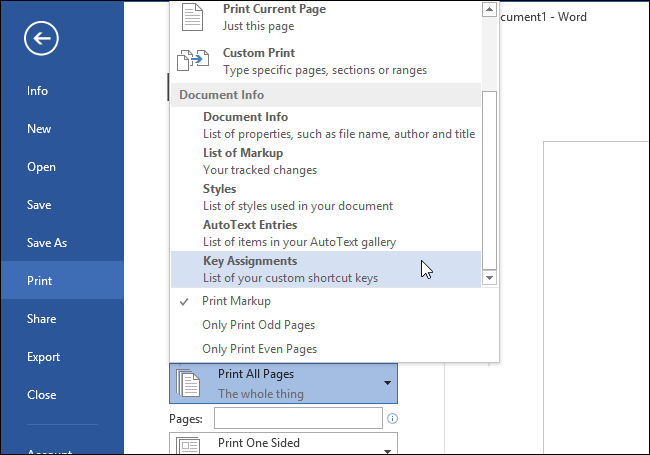
In any document, click Print to open the Print dialog. Select Word settings, and in the Print What drop-down, select Key assignments (Fig. 3 shows the Mac interface, Fig. 4 shows Windows, though these dialog boxes vary slightly on any computer, depending on your OS and your printer).
Figure 3 Mac Print dialog
Figure 4 Windows Print dialog
This only prints a list of the shortcuts you created, not those built into the system, such as those for Select All or Save.
Not only does Outline view in Word let you assess the structure of a document, it lets you move chunks of content with a click. On the View ribbon, click Outline in the Views group on the far left. Or at the far right of the document frame, click the icon on the bottom that looks like a bullet list (Figure 1). This displays the document as chunks of content, each marked by a square, minus or plus sign as shown in Figure 2. A plus sign means that there is content “within” that level. In the example, the Shortcut heading has no content “within” it but the List heading does.
These fast and accurate ways to select text
can revolutionize the way you work. Keyboard shortcuts are especially good when
precision is required to cut, copy, or style content, or when a very large chunk
is concerned. These shortcuts won’t jump unexpectedly like a mouse can.
Not only do these methods work in Word,
they work in most other software including WordPress, Adobe Acrobat, and other
content management systems. (Instructions for Windows users appear in brackets
if they’re different from the Mac instructions.)
Select the word the cursor is in, then the sentence, paragraph, or the whole document using this toggle repeatedly: fn + F8. To quit this mode, press escape.*
Select an entire sentence with cmd + click anywhere in the sentence. (In Windows: ctrl + click)
Select one word forward or back of the cursor’s position with shift + opt + right/left arrow. (In Windows: shift + ctrl + right/left arrow)
Select one paragraph forward or back with shift + opt + up or down arrow. (In Windows: shift + ctrl + down/up arrow)
Select a word with a double-click and the whole paragraph with three clicks.
*The fn key lets you access the root functions of the F keys that are now usually mapped to shortcuts like screen brightness and volume controls. If your F keys don’t operate computer functions, you may not have to press the fn key.